You can use the SSH connection with OAuth2 authentication method to connect to Keycloak with SSH. This requires that you generate an SSH key pair and register it in your Keycloak account. You will then need to configure your SSH client to use the OAuth2 authentication method. Once you have configured your SSH client, you can then establish an SSH connection with Keycloak using the OAuth2 authentication method.
Linux PAM authentication
PAM is « Pluggable Authentication Modules ». It is an interface and some libraries to authenticate a user in the system using other implementations. http://www.linux-pam.org/whatispam.html
With this mecanism, others implementations are available all around the web. This is how you can connect a Linux machine to a LDAP directory for example. Google has published a PAM module demonstrating two-factor authentication : https://github.com/google/google-authenticator-libpam.
We can found many PAM modules connected to an oauth2 server :
- https://github.com/CyberDem0n/pam-oauth2 based on token authentication
- https://github.com/ondrejvelisek/pamoauth2device using a device_flow oauth2 process (see bellow)
- https://github.com/shimt/pam-exec-oauth2 using a standard Resource owner password flow.
Device flow
device flow is still in a draft state https://tools.ietf.org/html/draft-ietf-oauth-device-flow-15
This flow is designed for terminals which a user can not interract directly with (or with low interractions such as a smart TV) or devices without a web browser.
  +----------+                                +----------------+
  |          |>---(A)-- Client Identifier --->|                |
  |          |                                |                |
  |          |<---(B)-- Device Code,      ---<|                |
  |          |          User Code,            |                |
  |  Device  |          & Verification URI    |                |
  |  Client  |                                |                |
  |          |  [polling]                     |                |
  |          |>---(E)-- Device Code,      --->|                |
  |          |          & Client Identifier   |                |
  |          |                                |  Authorization |
  |          |<---(F)-- Access Token      ---<|     Server     |
  +----------+   (& Optional Refresh Token)   |                |
        v                                     |                |
        :                                     |                |
       (C) User Code & Verification URI       |                |
        :                                     |                |
        v                                     |                |
  +----------+                                |                |
  | End user |                                |                |
  |    at    |<---(D)-- End user reviews  --->|                |
  |  Browser |          authorization request |                |
  +----------+                                +----------------+
The most common way of using this flow (for « C » arrow ) is qr code based transmission informations.
This is the flow used when you try to log in from a console, ie with the Microsoft Azure command line :
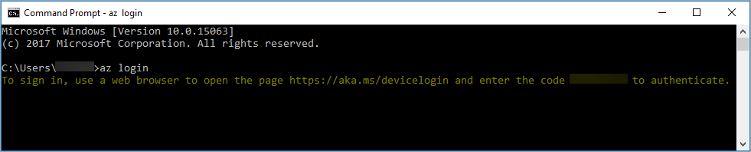
The code is a token, called « User code » in the schema above.
This flow is a master piece of oauth2 future. It can simplify a lot interactions and login directly with a smartphone to a smart TV or other connected equipments. It really works like magic !
A great example is available at : https://alexbilbie.com/2016/04/oauth-2-device-flow-grant/
Resource owner password flow
It is the simpliest way to authenticate on an authentication server. An application sends directly collected userid/password (and clientid/clientsecret) to the /auth endpoint. OAuth2 server responds with an access_token.
https://tools.ietf.org/html/rfc6749#section-1.3.3
As said : The credentials should only be used when there is a high degree of trust between the resource owner and the client (e.g., the client is art of the device operating system or a highly privileged application), and when other authorization grant types are not available (such as an authorization code).
In this use case, we have the source code of our application so we can trust it.
Connect Linux to oauth2 : Resource owner password flow
Keycloak configuration
First step, we need an authentication server. Can you use Google, Facebook or Twitter ? Of course not, they do not have Resource owner password flow available for all reasons we can imagine.
For this Demo, we will use a keycloak realm.
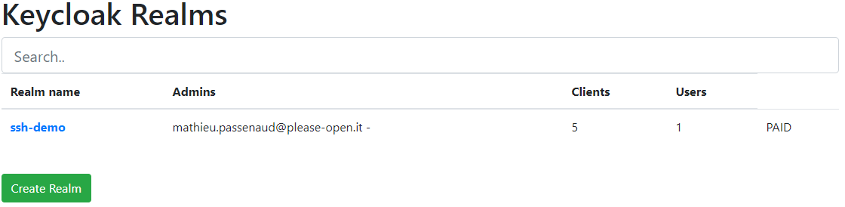
Open your newly created realm. Your please-open.it account opens your realm as an admin. Go to clients :

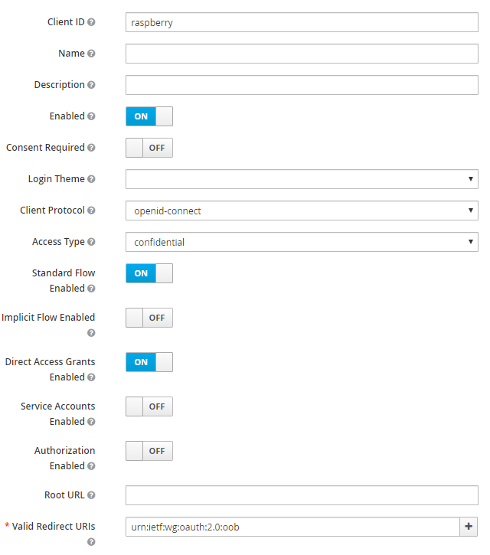
Create a new client, IE « raspberry ». A « root URL » is not necessary.
Put « Access Type » to « confidential ». In « Valid Redirect URIs », just add « urn:ietf:wg:oauth:2.0:oob » (we will see why after). Do not forget to save.
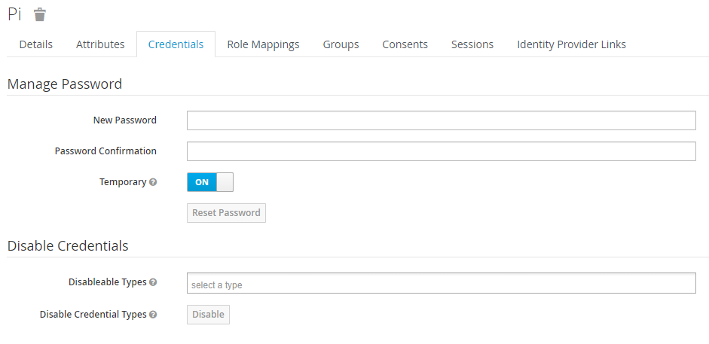
Retreive the client secret in « Credentials » tab.
Now create a « pi » user. Do not forget to initialize a password for the user.
PAM module
Install
For the first example, we will use https://github.com/shimt/pam-exec-oauth2 right out the box.
On a desktop machine with Go (and all paths correctly set), build it for raspberry with build-linux-arm.bat script. Thanks to the author for this little attention !.
A fat binary is avalaible in bin/linux_arm directory. Transfer it to your newly raspberry pi (with ssh enabled).
Just follow the documentation :
PREFIX=/opt/pam-exec-oauth2
sudo mkdir $PREFIX
sudo cp go/bin/pam-exec-oauth2 $PREFIX/pam-exec-oauth2
sudo touch $PREFIX/pam-exec-oauth2.yaml
sudo chmod 755 $PREFIX/pam-exec-oauth2
sudo chmod 600 $PREFIX/pam-exec-oauth2.yaml
Now it’s time to expose this new authentication method.
In the given documentation, it reffers to /etc/pam.d/common-auth file. In our example, we only activate this authentication method for ssh. So we will modify the /etc/pam.d/sshd file.
Add the line (at the begining) :
auth sufficient pam_exec.so expose_authtok /opt/pam-exec-oauth2/pam-exec-oauth2
For this use, we do not create local users automatically. It means that you need to have a local user with the same id like in the oauth.
Configuration
The « redirect-url » is explained here : https://stackoverflow.com/questions/46643795/oauth-2-device-flow-redirect-url
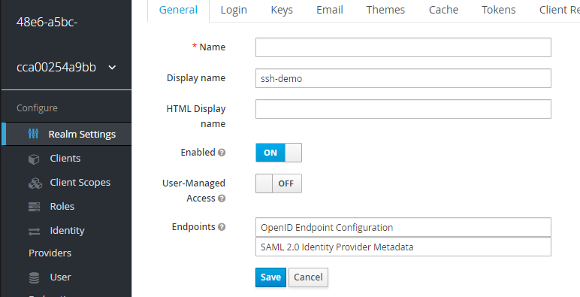
To retreive urls, go to your realm and click on « OpenID Endpoint configuration ». You will have a Json object showing all realm url’s. Get the auth and token urls.
In the file /opt/pam-exec-oauth2/pam-exec-oauth2.yaml
{
    client-id: "raspberry",
    client-secret: "xxxxxxxxxxxxxxxxxxxxxxxxxxxxxxxxxxxxxxxxxxxx",
    redirect-url: "urn:ietf:wg:oauth:2.0:oob",
    scopes: ["openid"],
    endpoint-auth-url: "https://app.please-open.it/auth/realms/xxxxxxxxx/protocol/openid-connect/auth",
    endpoint-token-url: "https://app.please-open.it/auth/realms/xxxxxxxxx/protocol/openid-connect/auth",
    extra-parameters: {
    },
    username-format: "%s",
}
Restart SSH : /etc/init.d/ssh restart
Now your oauth2 account login is required to open a « pi » session.

Please-open.it is JANUA.FR's main partner. Specialised in IAM (security, access control, identity management) and Open Source integration, settled in 2004 by IAM industry veteran, Open-IAM (Janua.fr) offers high value-added products and services to businesses and governements with a concern for identity management and Open Source components.
Janua.fr, a trademark of Open-IAM is an IT services and business consultancy company, created in July, 2004, by SUN Microsystems identity management industry veterans. Janua IAM activity spinned-off in August 2025 to Open-IAM.
- Protect Your Privacy: Secondary Email in Keycloak - 29 mai 2026
- Keycloak OAuth2-Proxy Configuration Generator: Simplify Your Reverse Proxy Authentication Setup - 26 janvier 2026
- Authentication Proxy: Simplify Authentication in Any Application - 24 décembre 2025