1) Presentation
This chapter illustrates how to install Keycloak with MariaDB database and how it is possible to configure MariaDB with KeyCloak.
The version used are:
- keycloak is 6.01
- mariadb is 10.3
This done throughout the following steps :
- (1) installation/configuration of mariadb database for keycloak
- (2) installation of mariadb mdoule within keyclaok deployement
- (3) Configuration of keycloak mariadb dasource and driver
2) installation/configuration of mariadb database for keycloak – install keycloak with mariadb
Mariadb is installed on ubuntu for this example, but it could be installed on any other OS.
2.1) install mariadb on ubuntu
Install mariadb on ubuntu
sudo apt install mariadb-server
You can verify it by typing:
sudo systemctl status mariadb
[sudo] Mot de passe de orivat :
● mariadb.service - MariaDB 10.1.40 database server
   Loaded: loaded (/lib/systemd/system/mariadb.service; enabled; vendor preset: enabled)
   Active: active (running) since Tue 2019-06-11 19:43:17 CEST; 12h ago
     Docs: man:mysqld(8)

 Main PID: 16500 (mysqld)
   Status: "Taking your SQL requests now..."
    Tasks: 28 (limit: 4915)
   CGroup: /system.slice/mariadb.service
           └─16500 /usr/sbin/mysqld

juin 11 19:43:16 rivat-G551JM mysqld[16500]: 2019-06-11 19:43:16 140476087843968 [Note] /usr/sbin/mysqld (mysqld 10.1.40-MariaDB-0ubuntu0.18.04.1) starting as process 16500 ...
….
…..
juin 11 19:43:17 rivat-G551JM systemd[1]: Started MariaDB 10.1.40 database server.
2.2) install mysql_secure_installation
Run command :
- sudo mysql_secure_installation
The script will
- set up the root user password
- remove the anonymous user,
- restrict root user access to the local machine
answer “Y” (yes) to all questions.
At this stage, mariadb can only be accessed as sudo, otherwise you get error message:
ERROR 1698 (28000): Access denied for user ‘root’@’localhost’ at Ubuntu 18.04
2.3) login as non sudo user
To be able to log as non sudo user, you have to run following commands (in italic bold)
sudo mysql -u root -p
[sudo] Mot de passe de orivat :
Enter password:
Welcome to the MariaDB monitor.  Commands end with ; or \g.
Your MariaDB connection id is 43
Server version: 10.1.40-MariaDB-0ubuntu0.18.04.1 Ubuntu 18.04

Copyright (c) 2000, 2018, Oracle, MariaDB Corporation Ab and others.

Type 'help;' or '\h' for help. Type '\c' to clear the current input statement.

MariaDB [(none)]> use mysql;
Reading table information for completion of table and column names
You can turn off this feature to get a quicker startup with -A

Database changed
MariaDB [mysql]> UPDATE user SET plugin='mysql_native_password' WHERE User='root';
Query OK, 1 row affected (0.00 sec)
Rows matched: 1  Changed: 1  Warnings: 0

MariaDB [mysql]> FLUSH PRIVILEGES;
Query OK, 0 rows affected (0.00 sec)

MariaDB [mysql]> exit;
Bye

now restart mysql server by following command

service mysql restart
MariaDB [mysql]> UPDATE user SET plugin='mysql_native_password' WHERE User='root';
Query OK, 1 row affected (0.00 sec)
Rows matched: 1  Changed: 1  Warnings: 0

MariaDB [mysql]> FLUSH PRIVILEGES;
Query OK, 0 rows affected (0.00 sec)

MariaDB [mysql]> exit;
Bye
orivat@rivat-G551JM:~/dev/keycloak/6.01/tests/keycloak-6.0.1/bin$ service mysql restart
orivat@rivat-G551JM:~/dev/keycloak/6.01/tests/keycloak-6.0.1/bin$ mysql -u root -p
Enter password:
Welcome to the MariaDB monitor.  Commands end with ; or \g.
Your MariaDB connection id is 5
Server version: 10.1.40-MariaDB-0ubuntu0.18.04.1 Ubuntu 18.04

Copyright (c) 2000, 2018, Oracle, MariaDB Corporation Ab and others.

Type 'help;' or '\h' for help. Type '\c' to clear the current input statement.

MariaDB [(none)]> exit
Bye
2.4) Create Keycloak database
Run the command Create DATABASE keycloak which creates the keycloak database in mariadb
MariaDB [(none)]> Create DATABASE keycloak;3) Mariadb ConnectorJ
Go to mariadb connector from following URL
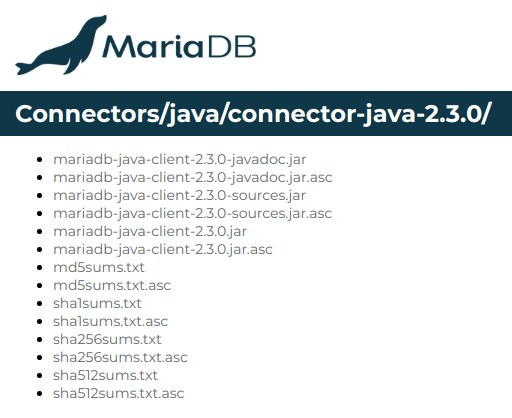
The driver to download is :
Let’s verify that is contains the Driver class
jar tvf mariadb-java-client-2.3.0.jar | grep Driver
  5091 Thu Sep 06 15:42:08 CEST 2018 META-INF/services/java.sql.Driver
  4179 Thu Sep 06 15:54:32 CEST 2018 org/mariadb/jdbc/Driver.class
Interesting to be noticed is driver path org/mariadb/jdbc/Driver., which will be used further when configuring the driver.
4) Install the mariadb driver module within keycloak
The steps are as follows :
(1) Create a com/mariadb/main module subdirectory, below modules
cd $KEYCLOAK_HOME
mkdir -p modules/com/mariadb/main
(2) copy the mariadb driver into this directory
cd modules com/mariadb/main
cp mariadb-java-client-2.3.0.jar .
(3) create a module.xml file within this directory as follows
5) Configure keycloak with mariadb
The configuration is located in xml file
- $KEYCLOAK_HOME/standalone/configuration/standalone.xml
The configuratin can be updated directly within the standalone.xml (or standalone-ha.xml) or using the management console
When running for the first time, easiest is to use the management console. In order to use the management console, you need to create an admin management user, using teh script add-user.sh
5.1) adding an admin management user
In order to use the management console, you need to create an admin management user, using teh script add-user.sh
sh add-user.sh

What type of user do you wish to add?
 a) Management User (mgmt-users.properties)
 b) Application User (application-users.properties)
(a): admin-user

 * Error *
WFLYDM0039: Invalid response. (Valid responses are A, a, B, or b)


What type of user do you wish to add?
 a) Management User (mgmt-users.properties)
 b) Application User (application-users.properties)
(a):

Enter the details of the new user to add.
Using realm 'ManagementRealm' as discovered from the existing property files.
Username : admin-user
Password recommendations are listed below. To modify these restrictions edit the add-user.properties configuration file.
 - The password should be different from the username
 - The password should not be one of the following restricted values {root, admin, administrator}
 - The password should contain at least 8 characters, 1 alphabetic character(s), 1 digit(s), 1 non-alphanumeric symbol(s)
Password :
WFLYDM0101: Password should have at least 1 digit.
Are you sure you want to use the password entered yes/no? yes
Re-enter Password :
What groups do you want this user to belong to? (Please enter a comma separated list, or leave blank for none)[  ]:
About to add user 'admin-user' for realm 'ManagementRealm'
Is this correct yes/no? yes
Added user 'admin-user' to file '/home/orivat/dev/keycloak/6.01/test1/keycloak-6.0.1/standalone/configuration/mgmt-users.properties'
Added user 'admin-user' to file '/home/orivat/dev/keycloak/6.01/test1/keycloak-6.0.1/domain/configuration/mgmt-users.properties'
Added user 'admin-user' with groups  to file '/home/orivat/dev/keycloak/6.01/test1/keycloak-6.0.1/standalone/configuration/mgmt-groups.properties'
Added user 'admin-user' with groups  to file '/home/orivat/dev/keycloak/6.01/test1/keycloak-6.0.1/domain/configuration/mgmt-groups.properties'
Is this new user going to be used for one AS process to connect to another AS process?
e.g. for a slave host controller connecting to the master or for a Remoting connection for server to server EJB calls.
yes/no? yes
To represent the user add the following to the server-identities definition <secret value="cGFzc3dvcmQ=" />
5.2) Using the admin management console
Keycloak is started in standalone-ha mode
sh standalone.sh -c standalone-ha.xml
….
09:30:58,822 INFO [org.jboss.as.server] (ServerService Thread Pool -- 57) WFLYSRV0010: Deployed "keycloak-server.war" (runtime-name : "keycloak-server.war")
09:30:58,863 INFO [org.jboss.as.server] (Controller Boot Thread) WFLYSRV0212: Resuming server
09:30:58,865 INFO [org.jboss.as] (Controller Boot Thread) WFLYSRV0060: Http management interface listening on
09:30:58,865 INFO [org.jboss.as] (Controller Boot Thread) WFLYSRV0051: Admin console listening on
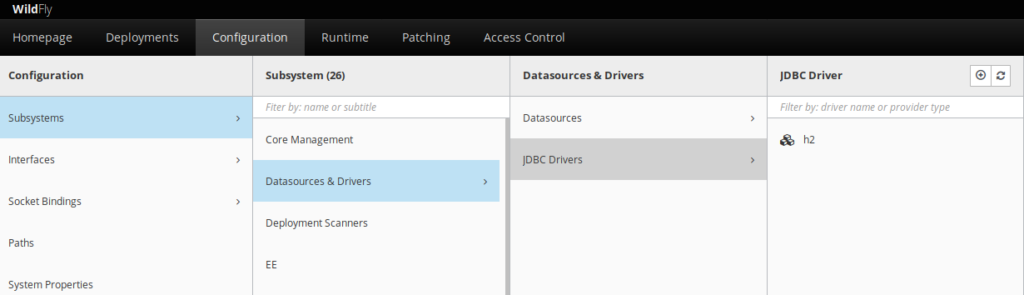
09:30:58,865 INFO [org.jboss.as] (Controller Boot Thread) WFLYSRV0025: Keycloak 6.0.1 (WildFly Core 8.0.0.Final) started in 15004ms - Started 672 of 937 services (652 services are lazy, passive or on-demand)The standalone has management port is 9990
To access to the admin management console goto
-
(1) log to https://localhost:9990/console
- as admin management user (created previously)
- Go to configuration
- Go to susbystems
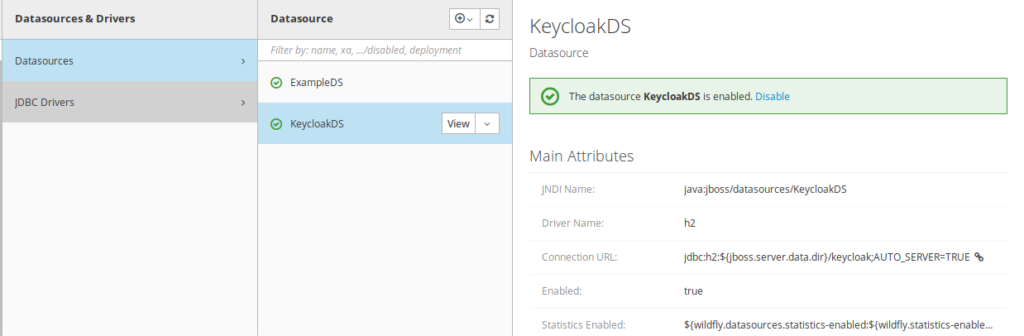
- Go to Datasources and drivers
You should see that the H2 driver is displayed.
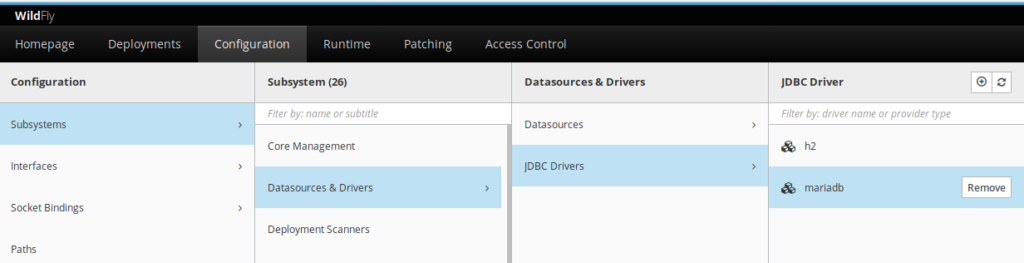
5.2) Installing Mariadb driver
Toggle the button on top right handcorner of the driver
iframe.
You should provide following information :
-
Driver Name :
- mariadb
-
Driver module Name :
- com.mariadb
-
Driver Class Name :
- org .mariadb.jdbc.Driver
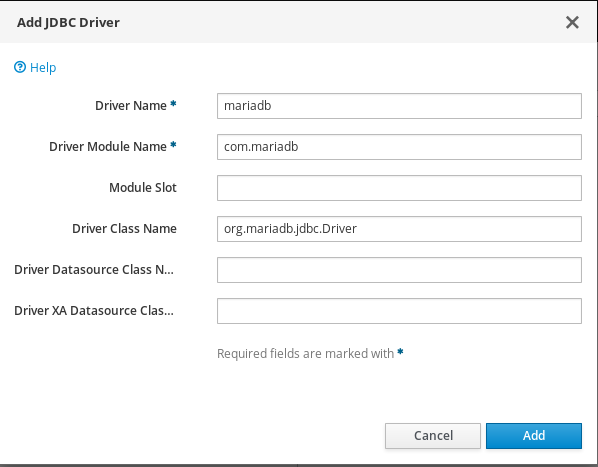
Upon successful configuration, the mariadb driver appears in the management console
5.3) Configuring the mariadb datasource
By default, after keycloak installation, it poinsgt to 2 datasources KeycloakDS and ExampleDS which are H2 based.
You need to peform following operations to configure a new DataSource
-
(1) Template
- Choose custom radio button
-
(2) Attributes
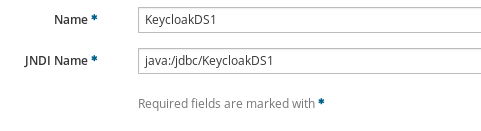
-
Name :
- KeycloakDS1
-
JNDI Name :
- java:jboss/datasources/KeycloakDS1
-
Name :
-
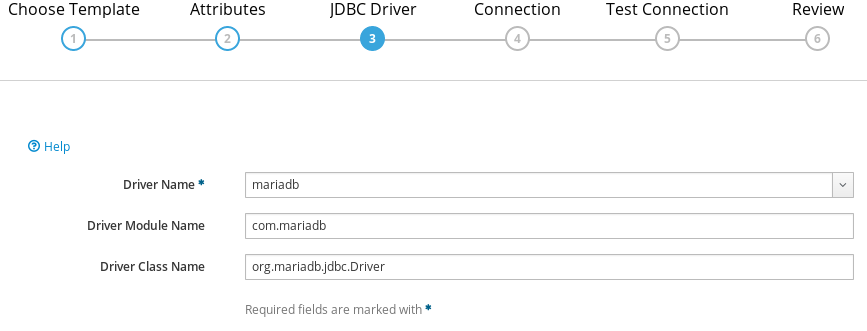
(3) JDBC Driver :
- Driver Name : mariadb
- Driver Module Name : com.mariadb
- Driver Class Name : org.mariadb.jdbc.Driver
-
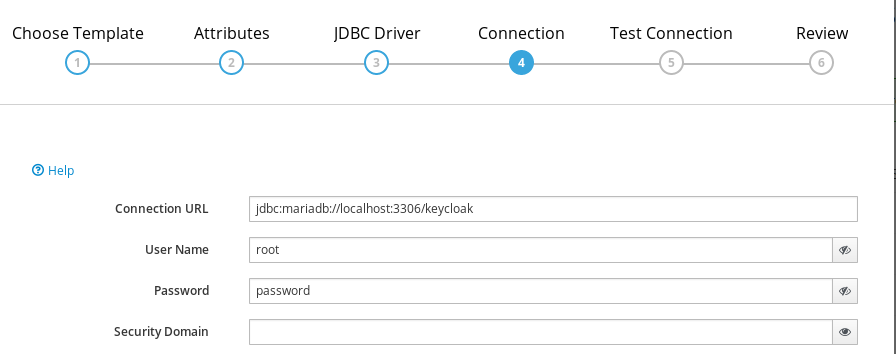
(4) Connection
- Connection URL : jdbc:mariadb://localhost:3306/keycloak
- UserName : root
- password : password
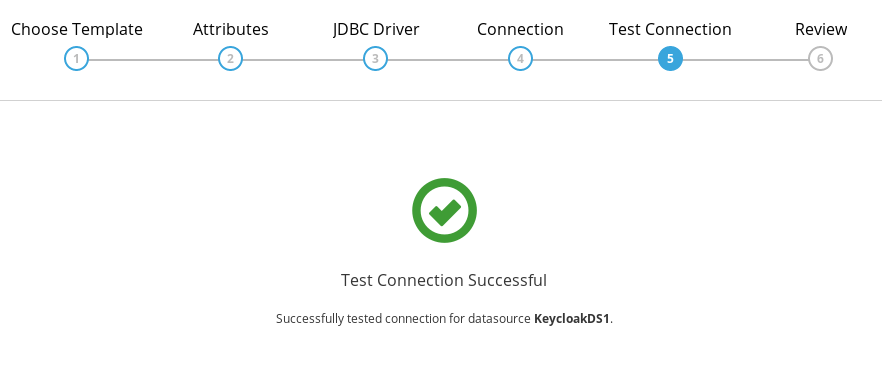
- 5) Test Connection
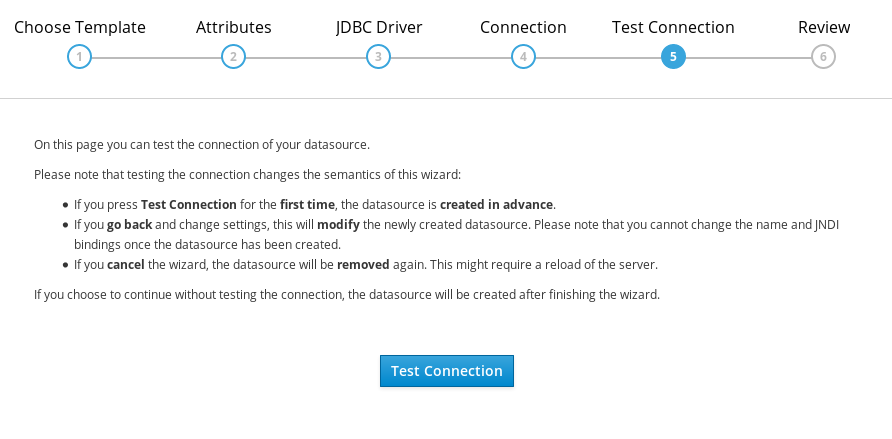
- (6) Successful connection
Upon Successful connection, message Test Succeeded is returned
-
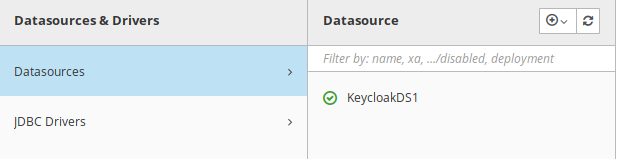
8) Displaying all the Datasources and removing H2
Datasources
- KeycloakDS1 has been added has a new datasource of keycloak pointing to mariadb. It is not in use yet
- There is still 2 other H2 Datasources (ExampleDS and KeyCloakDS) which needs to be removed
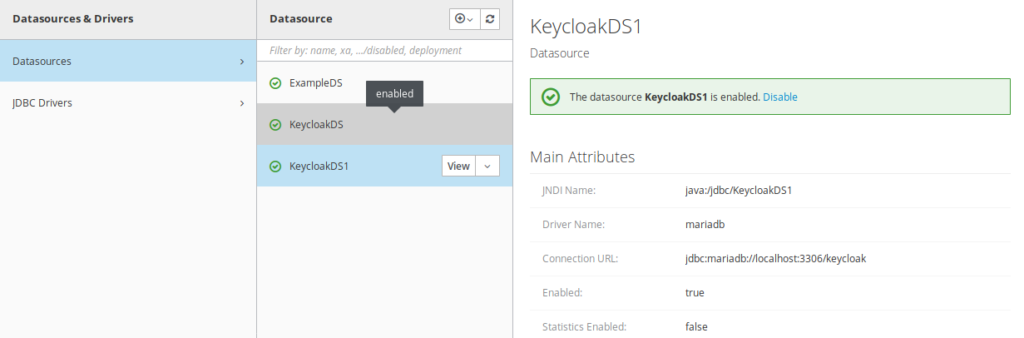
At the end there is only the KeycloakDS1 datasource left.
5.5) modify the JNDI properties
The value of the dataSource has to be updated with what you have put as JNDI Name previously
( java:jboss/datasources/KeycloakDS1)
6) Starting Keycloak with mariadb
You can now start keycloak
sh standalone.sh -c standalone-ha.xml6.1 Possible error
Keycloak is likely to fail with following error message
13:45:45,286 ERROR [org.keycloak.connections.jpa.updater.liquibase.conn.DefaultLiquibaseConnectionProvider] (ServerService Thread Pool -- 63) Change Set META-INF/jpa-changelog-1.9.1.xml::1.9.1::keycloak failed. Error: (conn=16) Row size too large. The maximum row size for the used table type, not counting BLOBs, is 65535. This includes storage overhead, check the manual. You have to change some columns to TEXT or BLOBs [Failed SQL: ALTER TABLE keycloak.REALM MODIFY CERTIFICATE VARCHAR(4000)]6.3 Undertanding the error message
The error message is by itself quite explantory. The row size of table in Mariadb is 65536, and the command ALTER TABLE keycloak.REALM MODIFY CERTIFICATE VARCHAR(4000) is failing due to this limitation.
This error is due to the fact that the encoding proviedd bt mariadb is utf8_mb4 (4 bytes).
6.4 Fixing the error message
The mariadb charset is provided in /etc/mysql/mariadb.conf.d
directory
Comment out all the lines referring to utf8_mb4 so
it can uses the default as fallaback (latin1° which is 2 bytes.
 grep utf8mb4 -n *
50-client.cnf:8:#default-character-set = utf8mb4
50-mysql-clients.cnf:8:#default-character-set = utf8mb4
50-server.cnf:111:#character-set-server  = utf8mb4
50-server.cnf:112:#collation-server      = utf8mb4_general_ci
6.5) Destroying previous database scheme
You need to remove mariadb keycloak scheme
MariaDB [keycloak]> drop database keycloak;
Query OK, 95 rows affected, 2 warnings (3.152 sec)

(2) creating a new database
MariaDB [(none)]> create database keycloak;
Query OK, 1 row affected (0.000 sec)

(3) verifying that the new database table is empty
MariaDB [(none)]> use keycloak;
Database changed
MariaDB [keycloak]> show tables;
Empty set (0.000 sec)
From now you can restart keycloak safely, and it will no longer bump into the issue seen before.

Open-IAM (Janua.fr) provides better security, buid relationships, and enable new cloud, mobile, and IoT offerings from any device or connected thing.
Janua.fr, a trademark of Open-IAM is an IT services and business consultancy company, created in July, 2004, by SUN Microsystems identity management industry veterans. Janua IAM activity spinned-off in August 2025 to Open-IAM.
- Identity and Digital Sovereignty with Keycloak - 26 juin 2026
- IAM & Regulatory Compliance - 2 avril 2026
- IAM: The Hidden GDPR Vulnerability in Your Cloud Stack - 19 mars 2026