How to get self-locking sessions in Keycloak with PIN step-up authentication : with our partner Please-Open It with share with you this article.
Have you ever wished your Keycloak sessions could lock themselves after a few minutes of inactivity on sensitive features — without logging users out? That’s exactly what this does. A user logs in with their password (good for hours), then enters a short PIN to access sensitive features (good for 5 minutes). When the PIN expires, the session stays alive but the sensitive stuff is locked until they re-enter the PIN.
No custom Java code for the locking mechanism. Just Keycloak’s built-in Level of Authentication (LOA) step-up, combined with the PIN Code Authenticator extension.
Repository: https://github.com/please-openit/keycloak-pin-code-authenticator
References: This is a real life implementation of the concepts described here : https://blog.please-open.it/posts/acr/ If you are not familiar with ACR/LOA and their technical behaviors, this article will help you understand.
Disclaimer and license
The auto-lock / LOA step-up mechanism described in this article relies entirely on built-in Keycloak features (available since Keycloak 23). The PIN Code Authenticator extension itself is production-ready — it includes Argon2 hashing, proper credential storage, admin PIN reset, and has been tested against Keycloak 26.x — but it comes without any warranty. Use it at your own risk.
If you find a bug or have an idea, feel free to open an issue or submit a pull request.
This project is distributed under the Apache 2.0 license. See LICENSE in the git repository.
The everyday frustration you already know
If you’ve spent any time administering Keycloak for a real company, you’ve probably been in this meeting. Someone from security says “sessions should time out after 5 minutes”. Someone from the business side says “our users are complaining they have to log in 40 times a day”. And you’re sitting in the middle, thinking: there has to be a better way.
Here’s the thing — both sides are right. A nurse looking at patient records shouldn’t still have access an hour after walking away from the screen. But a back-office employee reviewing reports shouldn’t need to re-enter their password every time they go grab a coffee.
Traditional approaches force you to pick a side:
| Approach | Downside |
|---|---|
| Short session timeout | Users re-enter credentials constantly — productivity killer |
| Long session timeout | Sensitive actions stay exposed for hours |
| Manual “lock screen” button | Users forget to click it — security gap |
| Separate login for sensitive areas | Clunky UX, users hate it |
What if you didn’t have to pick? What if the session could just… lock itself?
The idea: two tiers of trust within a single session
The concept is surprisingly simple once you see it. Instead of one session timeout that applies to everything, you create two levels of trust — each with its own lifetime:
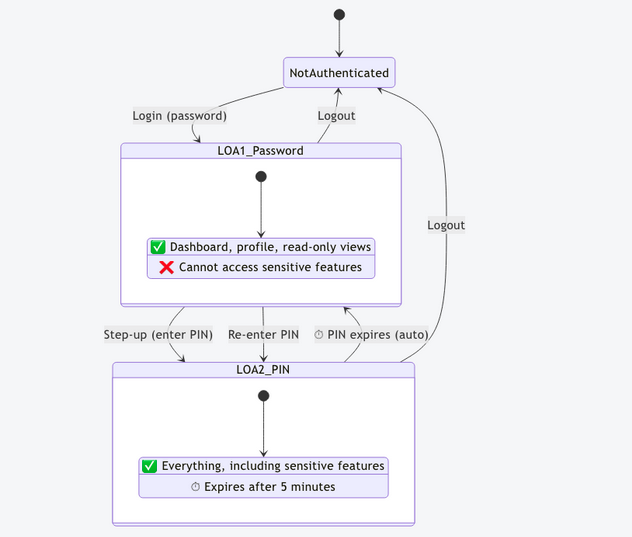
| Level | What the user did | What they can access | How long it lasts |
|---|---|---|---|
| LOA 1 | Entered username + password | Basic features (dashboard, profile, read-only views) | 10 hours (full workday) |
| LOA 2 | Entered their PIN | Everything — including sensitive features | 5 minutes (then auto-expires) |
When LOA 2 expires, the session doesn’t end. The user simply drops back to LOA 1 — still logged in, still productive, just locked out of the sensitive stuff until they tap their PIN again. No re-entering the password. No lost work. No frustration.
And the best part? This uses zero custom code for the locking mechanism itself. It’s all built into Keycloak already. You just need a second authentication factor — and that’s where the PIN extension comes in.
Let’s see it in action
Enough theory. Here’s a complete walkthrough using the demo application included in the repository. You’ll see exactly what the user experiences, from first login to auto-lock.
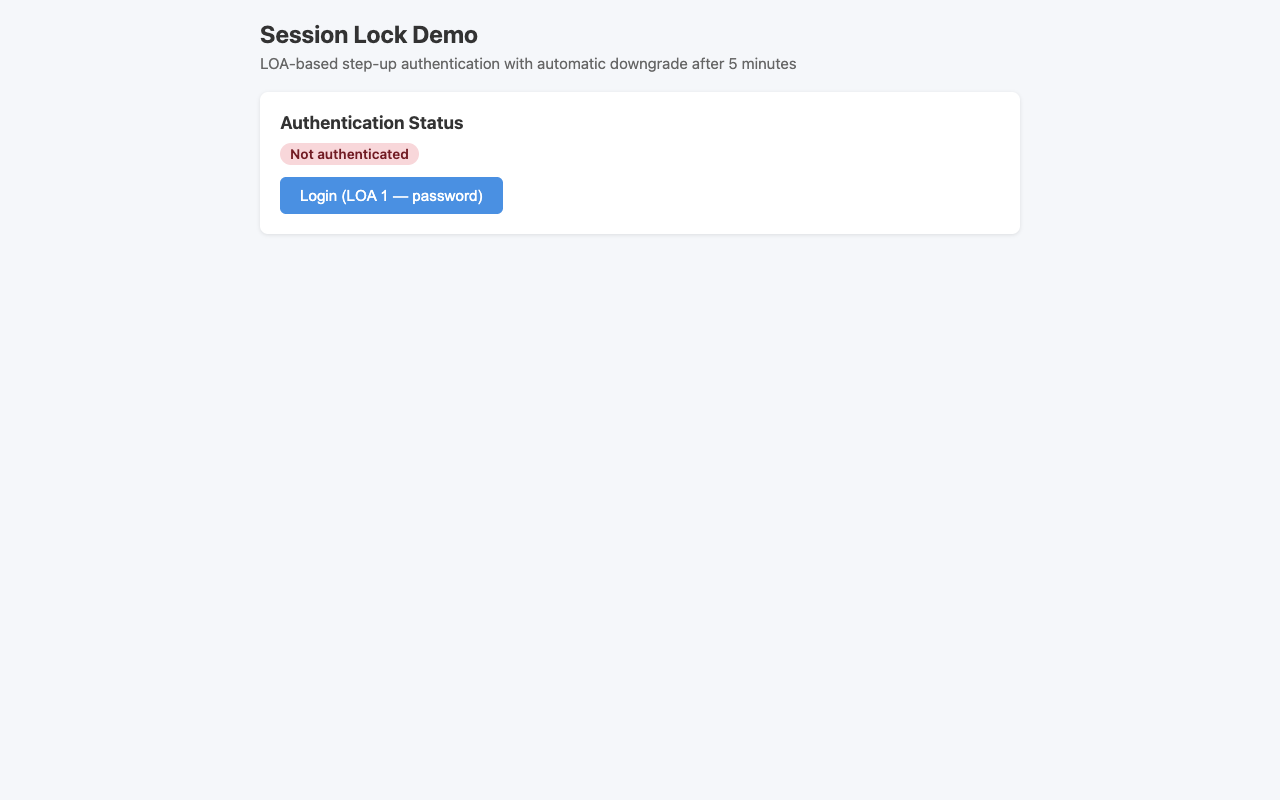
Starting point — not logged in
The user opens the application. Nothing fancy — just a login button.
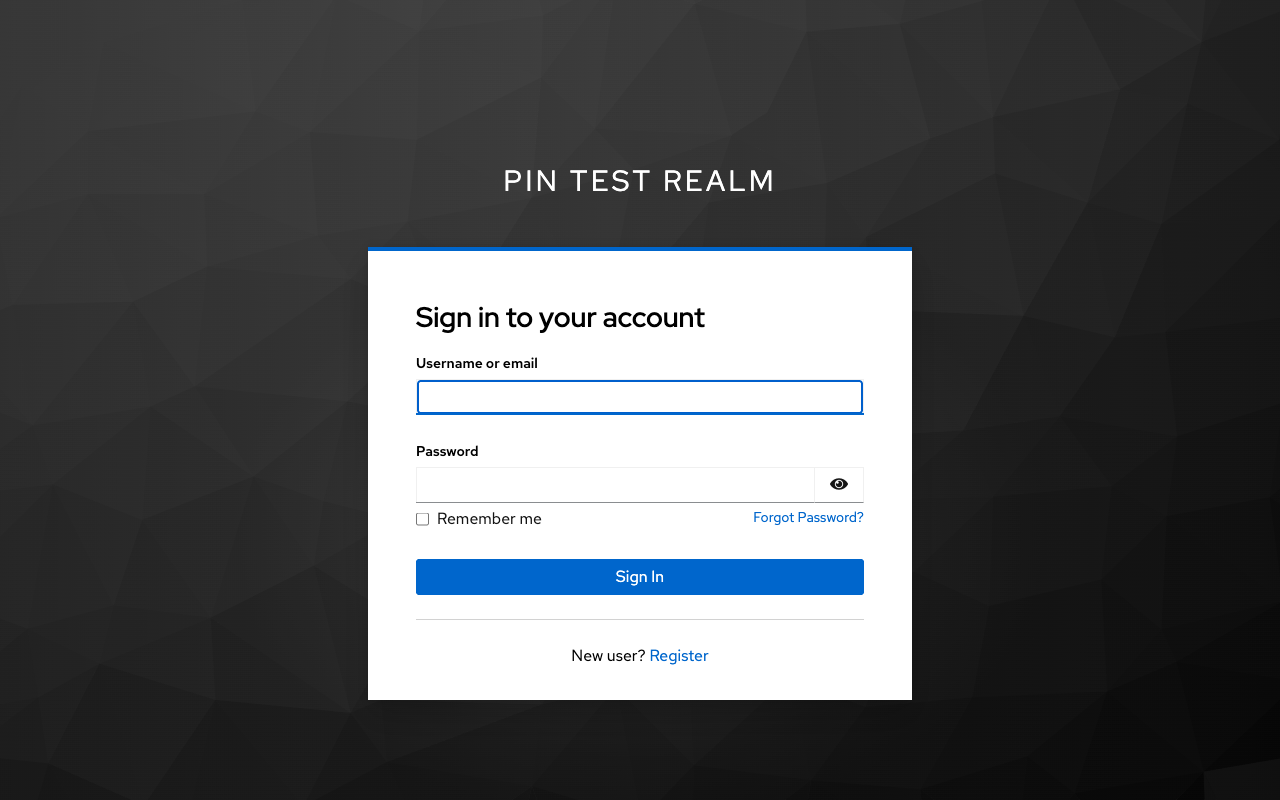
Logging in with a password
Clicking Login redirects to Keycloak’s standard login form. The user enters their password. This gets them to LOA 1 — basic access.
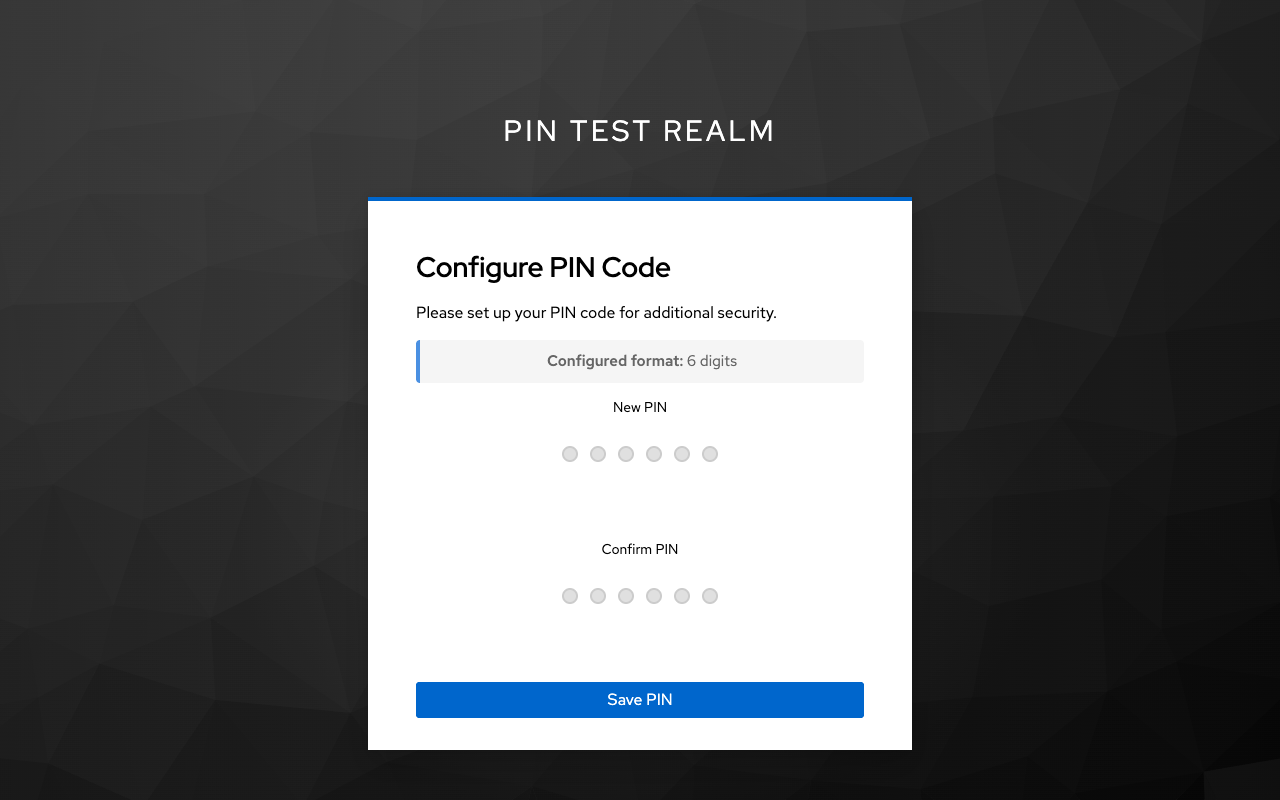
First-time PIN setup
On their very first login, the user is asked to choose a PIN. This is a one-time setup step using Keycloak’s Required Action mechanism. The PIN is hashed with Argon2 and stored securely — the user never has to set it up again.
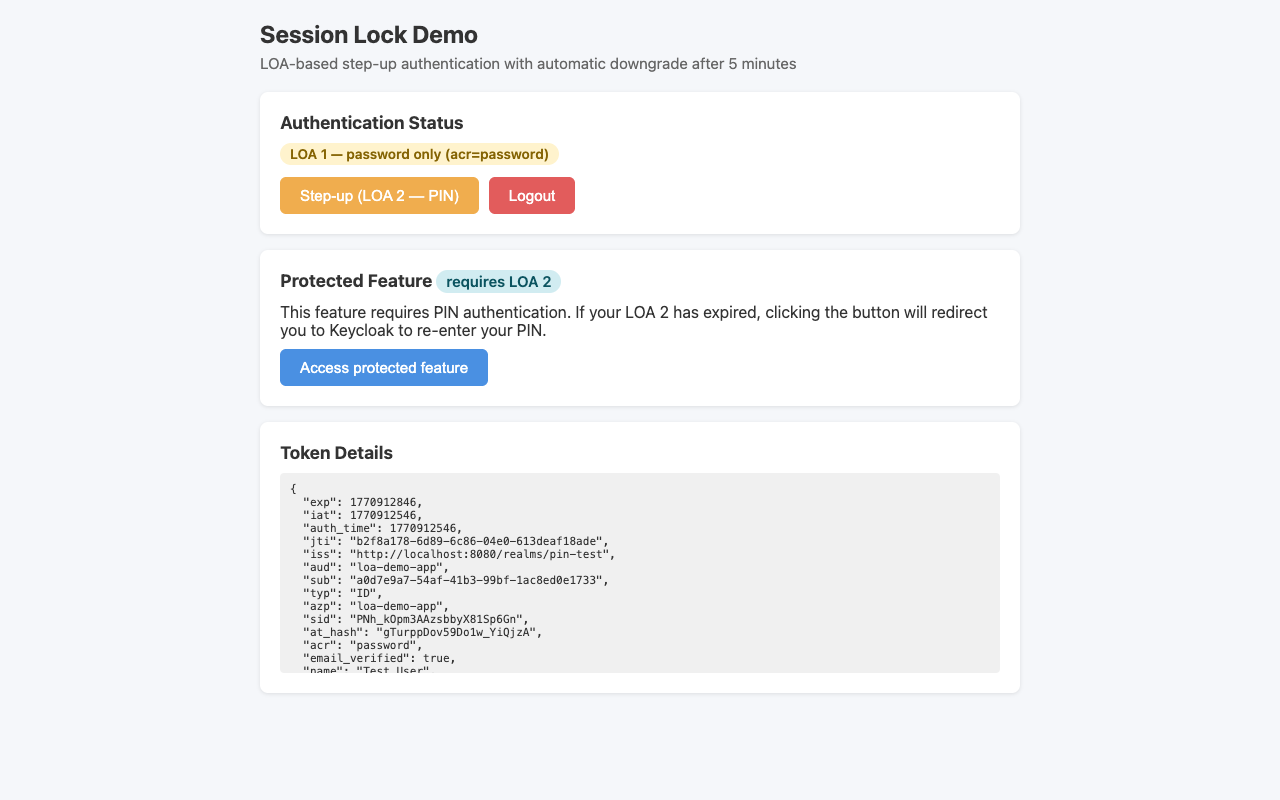
Authenticated at LOA 1 — basic access
Back in the app, the user is logged in with basic access. The orange LOA 1 badge shows their current trust level. They can browse the dashboard and view their profile, but the sensitive features? Locked.
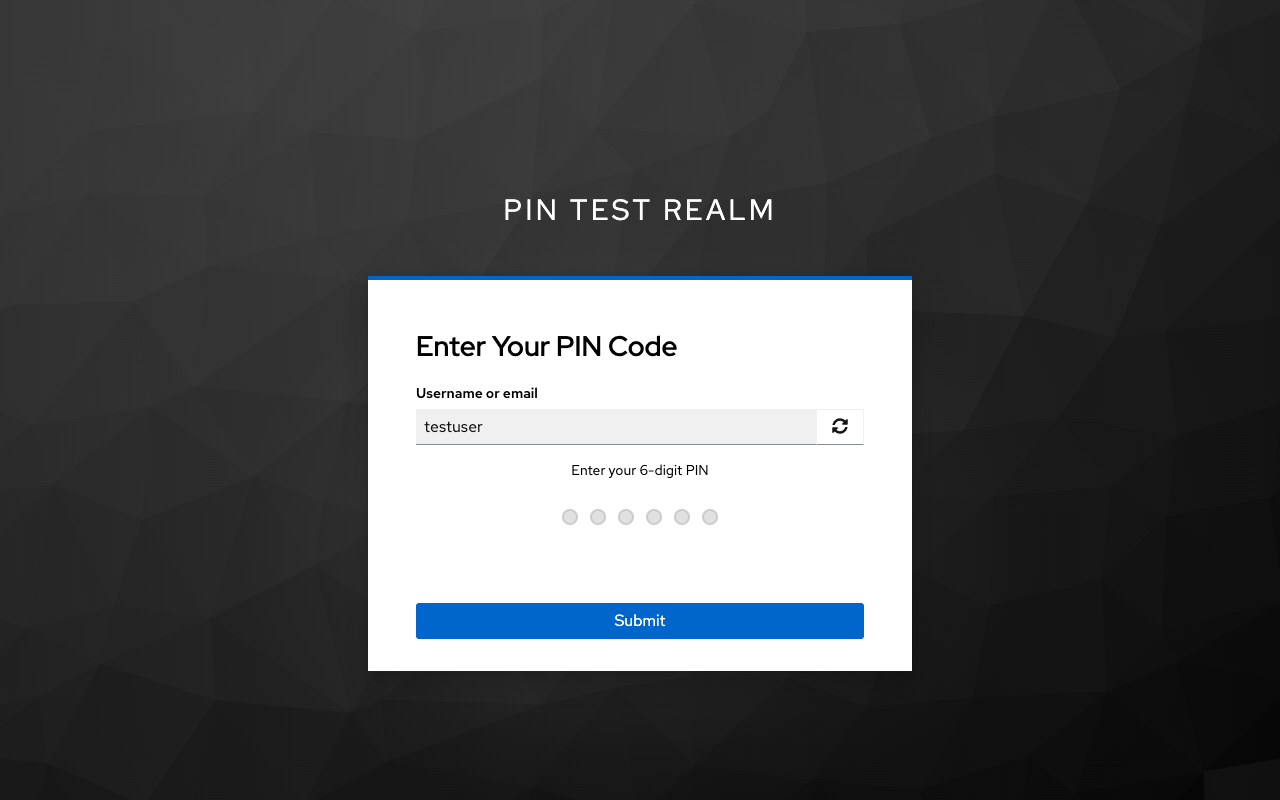
Stepping up to LOA 2
When the user clicks Step-up (or tries to access a protected feature), the app redirects to Keycloak. Since the password session is still valid, Keycloak only asks for the PIN — no password re-entry.
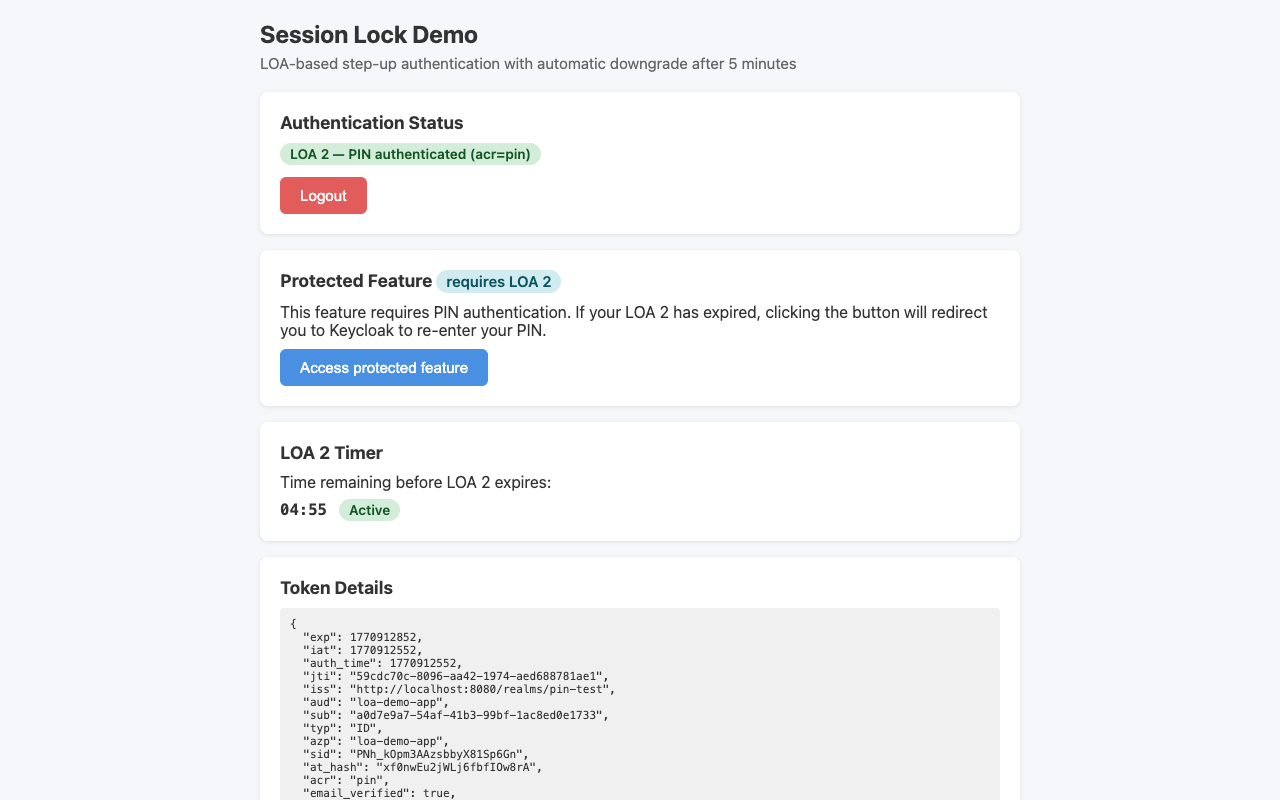
Full access at LOA 2
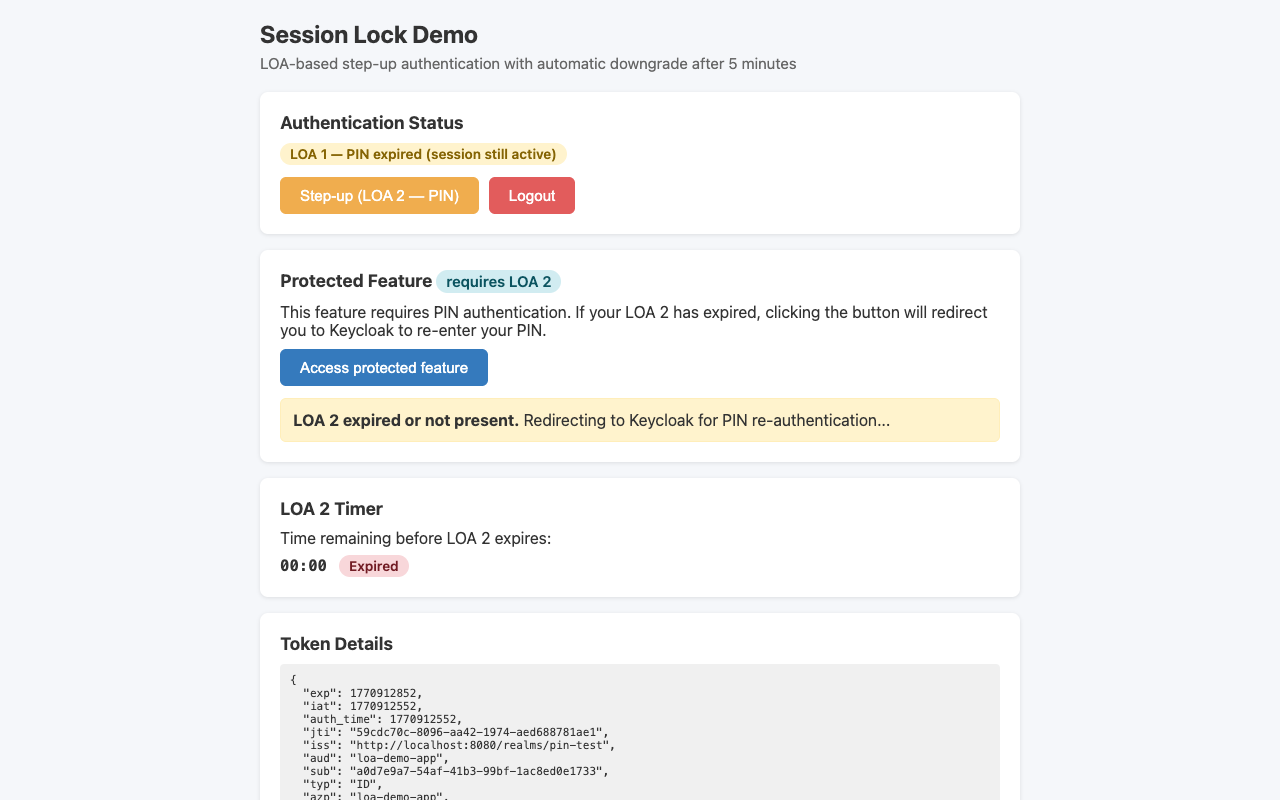
After entering the correct PIN, the app shows LOA 2 with a green badge and a countdown timer. The user knows exactly how long until the elevated access expires.
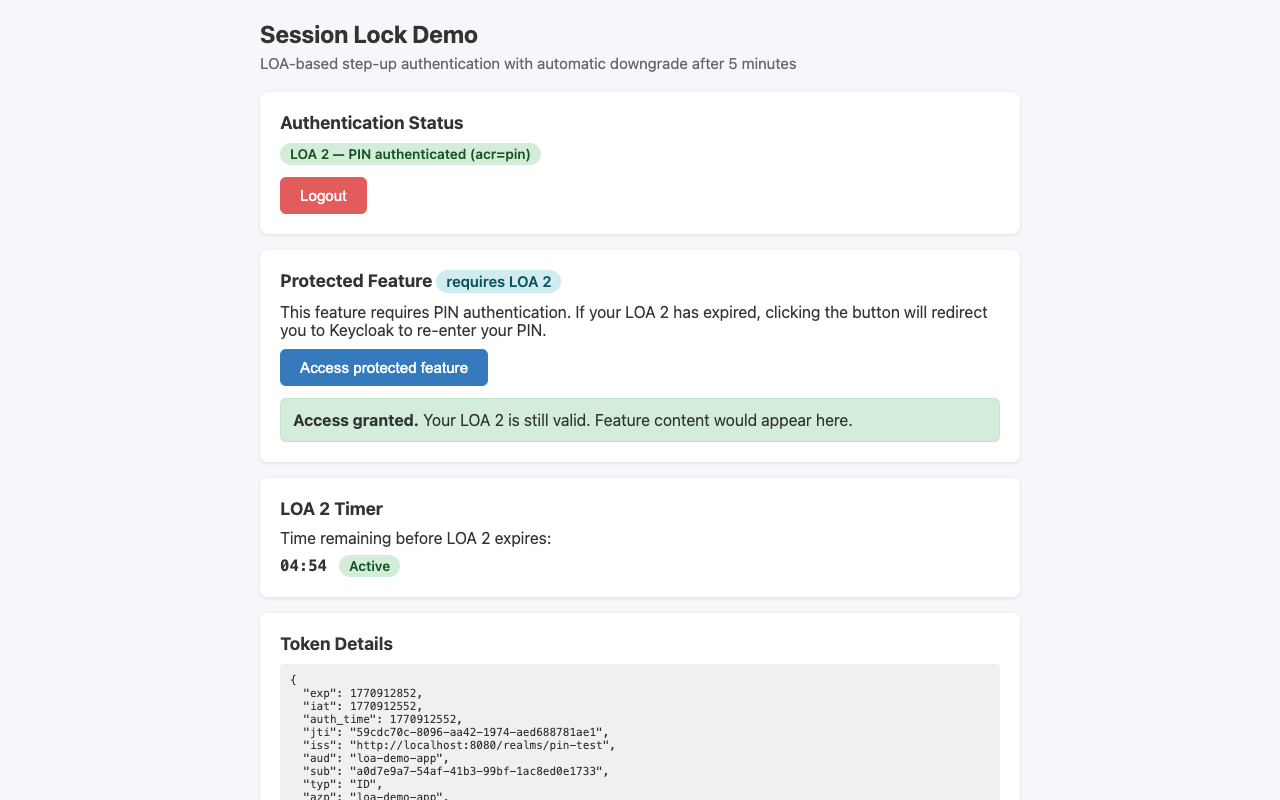
Accessing the protected feature
While LOA 2 is active, sensitive features work. The app checks the acr claim in the token to verify that the user’s trust level is high enough.
The auto-lock kicks in
Five minutes pass. The timer runs out. The session is NOT destroyed. But when the user tries to access the protected feature again, the app detects that LOA 2 has expired and redirects to Keycloak for PIN re-entry.
The cycle repeats: enter PIN → 5 minutes of full access → auto-lock → enter PIN again. The user is never logged out, never loses their work, never has to re-enter their password.
What’s happening under the hood
Now let’s look at the Keycloak configuration that makes all of this work. If you’ve ever created a custom authentication flow in Keycloak, you’ll find this very familiar.
The authentication flow
The entire mechanism is a single browser flow with two conditional sub-flows, each gated by Keycloak’s built-in Level of Authentication Condition.
Here’s what it looks like in the Keycloak admin console:
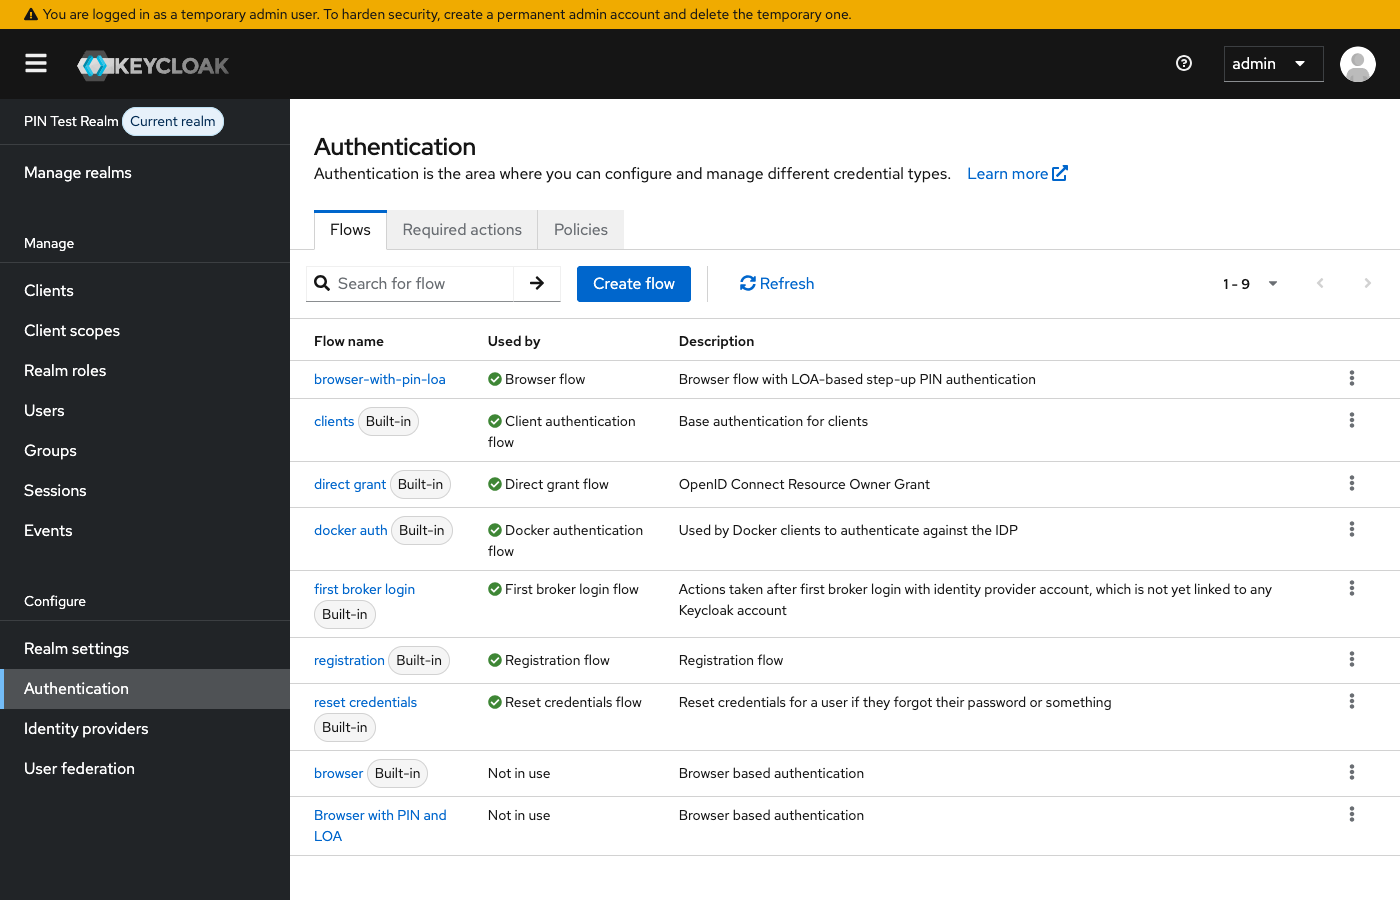
And here’s the flow detail — you can see the two LOA conditions with their respective authenticators:
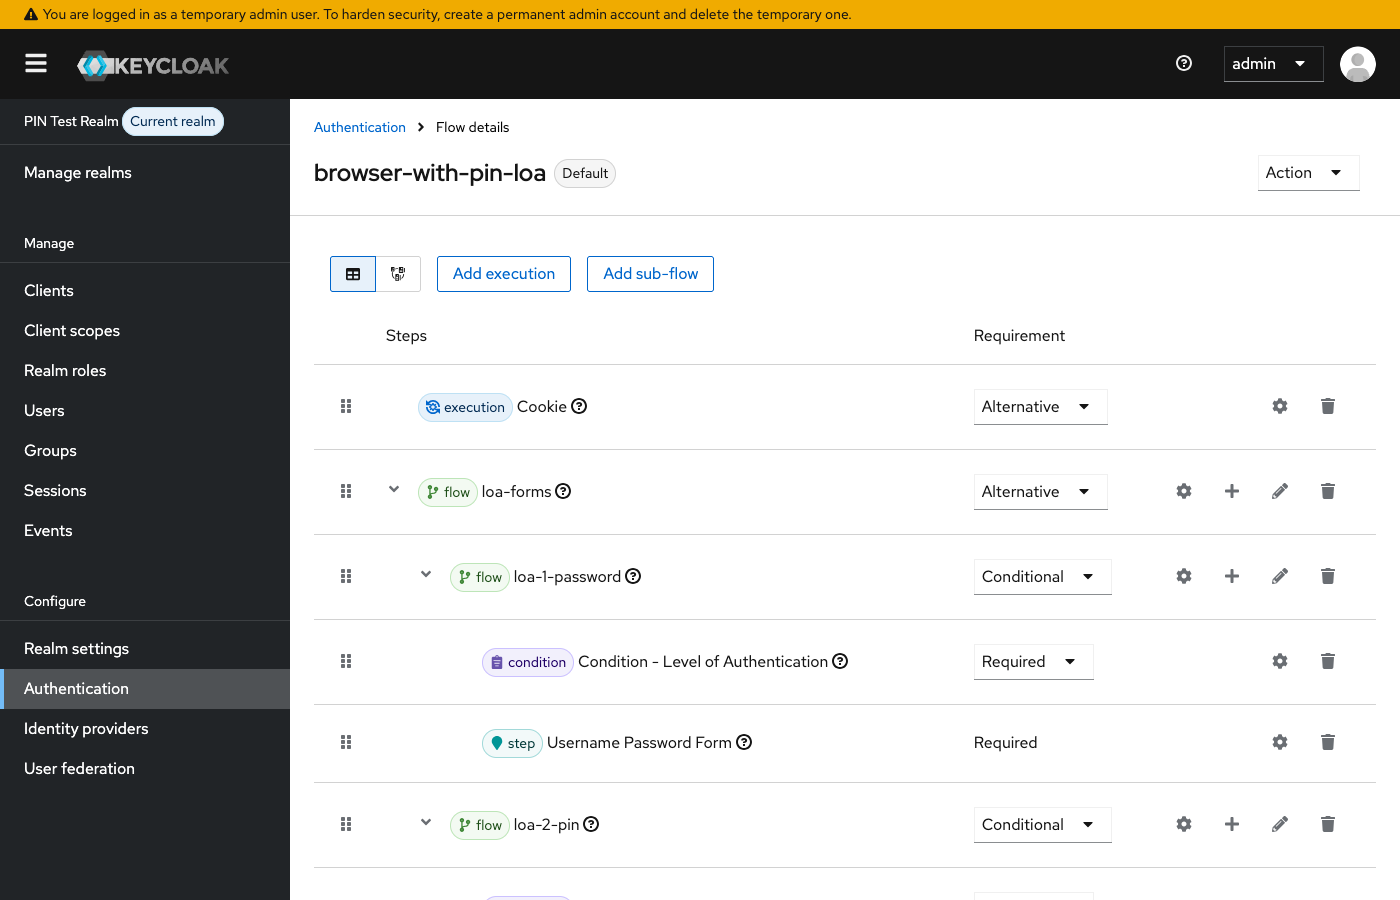
In text form, the flow structure is:
browser-with-pin-loa (top-level flow)
│
├── Cookie [ALTERNATIVE]
│   └── Checks for existing SSO session
│
└── Forms [ALTERNATIVE]
    │
    ├── LOA 1 — Password [CONDITIONAL]
    │   ├── Condition: Level of Authentication (level=1, maxAge=36000s)
    │   └── Executor: Username Password Form
    │
    └── LOA 2 — PIN [CONDITIONAL]
        ├── Condition: Level of Authentication (level=2, maxAge=300s)
        └── Executor: PIN Code Authenticator
The magic is in the maxAge values. LOA 1 (password) lasts 36,000 seconds (10 hours). LOA 2 (PIN) lasts just 300 seconds (5 minutes). When a client requests LOA 2 and those 5 minutes have elapsed, Keycloak automatically triggers the PIN form — without touching the password session at all.
The decision tree
Here’s exactly how Keycloak evaluates each authentication request:

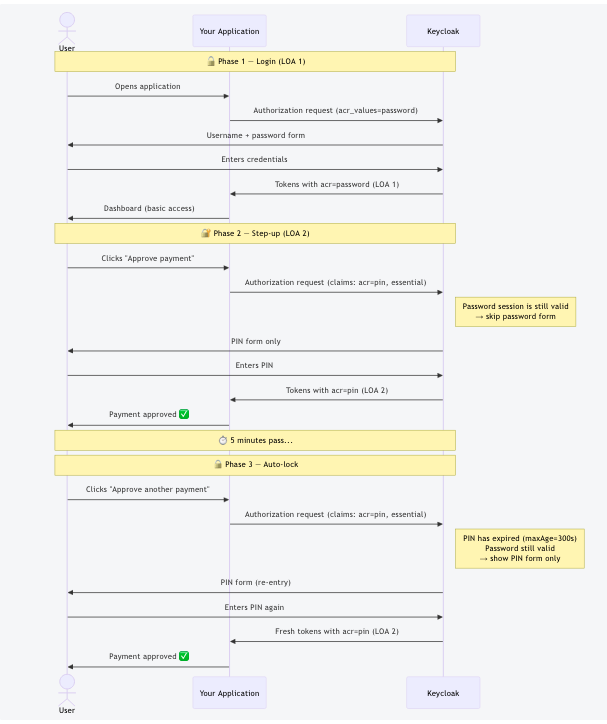
The full sequence of events
If you’re more of a sequence-diagram person, here’s the complete interaction between the user, your application, and Keycloak across all three phases — login, step-up, and auto-lock:
The user’s credentials in Keycloak
From the admin side, you can see that the user has two credential types stored — their password and their PIN:

The PIN is hashed with Argon2 (just like the password). It can be reset by an admin, which triggers a “Configure PIN” required action on the user’s next login.
Setting this up yourself
If you’ve made it this far and you’re thinking “I want to try this” — good news: the entire setup takes about 15 minutes. Here’s everything you need.
Prerequisites
- Keycloak 23+ (LOA conditions were introduced in Keycloak 23 — this demo tested on 26.5.3)
- The PIN Code Authenticator extension JAR in your
providers/directory - An OIDC client for your application
Step 1 — Create the authentication flow
In the Keycloak admin console, go to Authentication → Flows and create a new top-level flow. Add executions in this order:
| Execution | Type | Requirement |
|---|---|---|
| Cookie | authenticator | ALTERNATIVE |
| Forms (sub-flow) | ALTERNATIVE | |
| ↳ LOA 1 — Password (sub-flow) | CONDITIONAL | |
| ↳ Level of Authentication Condition | condition | REQUIRED |
| ↳ Username Password Form | authenticator | REQUIRED |
| ↳ LOA 2 — PIN (sub-flow) | CONDITIONAL | |
| ↳ Level of Authentication Condition | condition | REQUIRED |
| ↳ PIN Code Authenticator | authenticator | REQUIRED |
Configure the LOA conditions:
| Sub-flow | loa-condition-level | loa-max-age |
|---|---|---|
| LOA 1 — Password | 1 | 36000 (10 hours) |
| LOA 2 — PIN | 2 | 300 (5 minutes) |
Step 2 — Map ACR values to LOA numbers
Keycloak needs to know that the string "password" means LOA 1 and "pin" means LOA 2. Add this attribute on the realm (Realm Settings → Attributes) and on each client (Client → Attributes):
acr.loa.map = {"password":1,"pin":2}
Step 3 — Add the ACR mapper to your clients
For each OIDC client, add a protocol mapper:
| Setting | Value |
|---|---|
| Mapper Type | User Session Note (ACR) |
| Token Claim Name | acr |
| Add to ID token | ON |
| Add to access token | ON |
Step 4 — Bind the flow
Go to Authentication → Flows, select your new flow, and bind it as the Browser flow.
Step 5 — Tune the timeout
The loa-max-age on LOA 2 is the knob you’ll want to turn. Here are some starting points:
loa-max-age | Duration | Best for |
|---|---|---|
60 | 1 minute | High-security: banking, healthcare |
300 | 5 minutes | Balanced default: general enterprise apps |
900 | 15 minutes | Convenience: internal tools |
3600 | 1 hour | Low-friction: infrequent sensitive actions |
0 | Every request | Maximum security: PIN on every single step-up |
Integrating it in your application
Your application triggers step-up authentication using standard OIDC parameters. No proprietary APIs, no Keycloak-specific SDKs. Any OIDC-compliant library will work.
Requesting elevated access
When a user tries to access a sensitive feature, redirect them to Keycloak’s authorization endpoint with the claims parameter:
// "I need ACR=pin, and it's mandatory"
const claims = JSON.stringify({
  id_token: {
    acr: { essential: true, values: ['pin'] }
  }
});

const authUrl = `${keycloakUrl}/realms/${realm}/protocol/openid-connect/auth`
  + `?client_id=${clientId}`
  + `&redirect_uri=${encodeURIComponent(redirectUri)}`
  + `&response_type=code`
  + `&scope=openid`
  + `&claims=${encodeURIComponent(claims)}`
  + `&code_challenge=${challenge}`
  + `&code_challenge_method=S256`;

window.location.href = authUrl;
Why
essential: true? Without it, Keycloak treats the ACR request as voluntary and might return a lower level. Withessential: true, Keycloak must satisfy the request — if the PIN has expired, it will prompt for re-entry.
Checking the trust level after redirect
Read the acr claim from the ID token to know what the user proved:
const payload = JSON.parse(atob(idToken.split('.')[1]));
const acrMap = { password: 1, pin: 2 };
const currentLoa = acrMap[payload.acr] || 0;

if (currentLoa >= 2) {
  showProtectedContent();  // ✅ Elevated access — go ahead
} else {
  redirectToStepUp();      // ⚠️ PIN expired — request step-up
}
Optional: client-side countdown timer
The demo app includes a countdown timer showing when LOA 2 will expire. This is purely a UX convenience — the real enforcement is always server-side.
const issuedAt = payload.iat * 1000;  // seconds → ms
const maxAge = 300 * 1000;            // 5 minutes
const expiresAt = issuedAt + maxAge;

const timer = setInterval(() => {
  const remaining = Math.max(0, expiresAt - Date.now());
  if (remaining === 0) {
    clearInterval(timer);
    showLockedState();
  } else {
    updateCountdown(remaining);
  }
}, 1000);
Beyond PIN: other use cases for LOA step-up
Have you noticed that nothing in the LOA mechanism is specific to PINs? You could swap the PIN authenticator with any second factor — OTP, WebAuthn, smart card — and the auto-lock behavior would work exactly the same way.
Here are some real-world scenarios where this pattern shines:
Healthcare — Patient record access
- LOA 1 (password): View appointment schedule, send messages, update personal info
- LOA 2 (PIN, 5 min): Access patient diagnoses, prescribe medication, view lab results
- Clinicians stay logged in during shifts but must re-PIN before each patient interaction
Finance — Transaction approval
- LOA 1 (password): View account balances, generate reports, browse history
- LOA 2 (PIN, 2 min): Approve wire transfers, modify beneficiary lists, change limits
- Back-office staff review data freely; approvals require fresh proof of identity
Enterprise — Admin consoles
- LOA 1 (password): View dashboards, read documentation, update profile
- LOA 2 (PIN, 15 min): Manage users, change configurations, access audit logs
- IT admins don’t re-login all day, but admin actions are gated
Shared workstations
- LOA 1 (password): General use of the shared terminal
- LOA 2 (PIN, 1 min): Any action tied to the individual user’s identity
- User walks away → PIN expires in 60 seconds → data is safe
You could even combine multiple step-up levels — LOA 1 for password, LOA 2 for OTP, LOA 3 for PIN — with increasingly shorter timeouts. Keycloak’s conditional flow mechanism supports this natively.
Limitations and things you should know
This isn’t a magic bullet. Here are the important caveats:
LOA doesn’t downgrade in real-time
Keycloak does not actively revoke LOA 2 when the clock runs out. The expiry is evaluated on the next authentication request — meaning when your application redirects the user to Keycloak. Between those requests, previously issued tokens remain valid until their own exp claim.
If you’re using JWT-based authentication (e.g., stateless API calls), make sure your access token lifespan is at most equal to the LOA max age. Otherwise, a token issued during LOA 2 could still be accepted after the PIN has “expired.”
The client-side timer is a UX signal, not enforcement
The countdown timer in the demo app is there to give users a visual cue. The actual enforcement happens server-side when the client redirects to Keycloak. A user who stays on the same page and never triggers a new auth request will keep their current LOA until the token expires.
This is not a screen lock
This mechanism doesn’t detect idle time or lock the screen. It’s a protocol-level session tier. If you need a screen lock, you’ll want to combine this with a client-side inactivity timer that triggers the step-up redirect.
The PIN extension is production-ready, without warranty
Unlike many proof-of-concept Keycloak extensions you’ll find on GitHub, this one is designed for real use:
- Argon2 hashing with transparent algorithm migration for future or custom hash integration.
- Admin PIN reset via email with required action
- Configurable formats (numeric, alphanumeric, custom patterns)
- Server-side visual keyboard with OCR obfuscation for kiosk-style input
- Fully unit-tested and E2E tested
That said, it comes with no warranty. Review the code, test it in your environment, and decide for yourself. The Apache 2.0 license gives you full freedom to modify and redistribute.
Try it yourself
The fastest way to understand this feature is to experience it. The entire demo runs locally with Docker — no cloud account needed.
Quick start
# Clone and build
git clone https://github.com/please-openit/keycloak-pin-code-authenticator.git
cd pin-code-authenticator
mvn clean package -DskipTests

# Start Keycloak + demo app (wipe volumes for clean realm import)
docker compose down -v && docker compose up -d

# Wait for Keycloak to be ready (~30s)
until curl -sf http://localhost:8080/health/ready > /dev/null; do sleep 5; done

echo "Open http://localhost:3000 in your browser"
Test credentials: testuser / password123
Walk through the demo manually — login, set up your PIN, step up, access the protected feature, wait for the timer, try again. It takes about 2 minutes and it really clicks once you see it.
Automated test (if you’re in a hurry)
A headed Puppeteer test runs the entire scenario in a visible Chrome window:
# Fast mode — 30-second PIN timeout instead of 5 minutes
node e2e/test-session-lock.js --fast

# Standard mode — real 5-minute timeout
node e2e/test-session-lock.js
The test walks through all 10 steps — from login to auto-lock to re-authentication — and keeps the browser open for visual inspection.
Conclusion
If you’ve ever struggled with the session-timeout-versus-usability dilemma, LOA step-up is the answer you didn’t know Keycloak already had. It’s been there since version 23, it requires zero custom code for the locking mechanism, and combined with a simple second factor like a PIN, it gives you auto-locking sessions that don’t annoy your users.
The PIN Code Authenticator extension gives you that second factor — Argon2-hashed, admin-resettable, format-configurable, and ready to drop into your providers/ directory.
Give it a try. Break it. Open an issue. Submit a PR. That’s how good software gets built.
Repository: https://github.com/please-openit/keycloak-pin-code-authenticator

Please-open.it is JANUA.FR's main partner. Specialised in IAM (security, access control, identity management) and Open Source integration, settled in 2004 by IAM industry veteran, Open-IAM (Janua.fr) offers high value-added products and services to businesses and governements with a concern for identity management and Open Source components.
Janua.fr, a trademark of Open-IAM is an IT services and business consultancy company, created in July, 2004, by SUN Microsystems identity management industry veterans. Janua IAM activity spinned-off in August 2025 to Open-IAM.
- Self-locking sessions in Keycloak with PIN step-up authentication - 6 mars 2026
- Digital Sovereignty : why your european business probably breaks GDPR law - 13 février 2026
- Keycloak User Agent Filter Authenticator - 5 juin 2025