In this article Janua’s CTO will share how to configuring SSL/TLS with DS389 aka RedHat DS
Step 1 – Create Keystore
Requirement
Position yourself in the directory
Cd /etc/dirsrv/slapd-myserver-5389
1.1) Creation of password files (pin.txt)
pin.txt (used by slapd)
echo « Internal (Software) Token:azerty1 » > pin.txt
Put correct permissions:
dirsrv dirsrv (chown)
400 (chmod)
This file is used at Directory startup
Note: Make sure pin.txt contains the password of your DB with the syntax as shown above
This part is detailed at:
• 9.4.1.5. Creating a Password File for Directory Server
Pin file (used by the db)
cat pin
azerty1
1.2) Creation of the database
cd /etc/dirsrv/slapd-myserver-5389
certutil -N -d . -f pin
Please note that for the DB it is the file pin which is used.
Files created
drwxrwx— 3 dirsrv dirsrv 4096 21 déc. 15:51 .
drwxrwxr-x 12 root dirsrv 4096 17 déc. 09:01 ..
-rw-rw—- 1 dirsrv dirsrv 65536 17 déc. 09:01 cert8.db
-r–r—– 1 dirsrv dirsrv 1676 17 déc. 09:01 certmap.conf
-rw——- 1 dirsrv dirsrv 70814 21 déc. 15:51 dse.ldif
-rw——- 1 dirsrv dirsrv 70814 21 déc. 15:51 dse.ldif.bak
-rw——- 1 dirsrv root 50677 17 déc. 09:01 dse.ldif.startOK
-r–r—– 1 dirsrv dirsrv 35156 17 déc. 09:01 dse_original.ldif
-rw-rw—- 1 dirsrv dirsrv 16384 17 déc. 09:01 key3.db
drwxrwx— 2 dirsrv dirsrv 4096 21 déc. 14:47 schema
-rw-rw—- 1 dirsrv dirsrv 16384 17 déc. 09:01 secmod.db
-r–r—– 1 dirsrv dirsrv 15142 17 déc. 09:01 slapd-collations.conf
Step 2 – Check *.db files permissions and certificates
• Each db file needs to have
◦ 600 as access rights
◦ dirsrv (owner) and dirsrv (group)
[root@myserver slapd-myserver-5389]# chmod 600 *.db
[root@myserver slapd-myserver-5389]# ls -al *.db
-rw——- 1 dirsrv dirsrv 65536 17 déc. 09:01 cert8.db
-rw——- 1 dirsrv dirsrv 16384 17 déc. 09:01 key3.db
-rw——- 1 dirsrv dirsrv 16384 17 déc. 09:01 secmod.db
A check is preformed to verify that the certificate DB is empty
certutil -d /etc/dirsrv/slapd-myserver-5389/ -L
Database needs user init
Certificate Nickname Trust Attributes
SSL,S/MIME,JAR/XPI
Step3 – Generate self signed certificate
Redhat 10 DS documentation (chapter 15)
9.3.5. Generating and Installing a Self-signed Certificate
3.1) generating a random file
openssl rand -out /tmp/noise_5389.bin 4096
3.2) Generating Self Signed req and creation
certutil -S -x -d /etc/dirsrv/slapd-myserver-5389/ -z /tmp/noise_5389.bin -n « server-cert » -s « CN=myserver.example.com » -t « CT,C,C » -m $RANDOM –keyUsage digitalSignature,nonRepudiation,keyEncipherment,dataEncipherment -f pin
Generating key. This may take a few moments…
3.3) Verification of Certificate Database Content
certutil -d /etc/dirsrv/slapd-myserver-5389/ -L
Certificate Nickname Trust Attributes
SSL,S/MIME,JAR/XPI
server-cert CTu,Cu,Cu
3.4) Viewing server certificate details
certutil -d /etc/dirsrv/slapd-myserver-5389/ -L -n server-cert
Certificate:
Data:
Version: 3 (0x2)
Serial Number: 26429 (0x673d)
Signature Algorithm: PKCS #1 SHA-256 With RSA Encryption
Issuer: « CN=myserver.example.com »
Validity:
Not Before: Fri Dec 21 16:06:29 2018
Not After : Thu Mar 21 16:06:29 2019
Subject: « CN=myserver.example.com »
Subject Public Key Info:
Public Key Algorithm: PKCS #1 RSA Encryption
RSA Public Key:
Modulus:
c2:b2:36:75:65:44:c4:7a:fd:67:72:22:b7:b1:22:f7:
76:16:0b:63:ba:a0:9d:c5:88:ee:d7:27:f2:ae:3a:89:
ca:88:31:0d:68:3e:2d:83:07:97:b2:ea:d9:d8:7a:4c:
a7:8e:11:46:55:0c:96:b4:af:50:b9:67:6a:2a:2a:40:
f8:c2:a8:ff:59:1f:15:05:33:e1:61:b1:e8:12:c3:7b:
23:73:aa:73:93:3b:0b:03:d0:2d:03:ee:90:97:4c:94:
4f:97:01:76:94:e6:7e:bb:7f:f2:48:60:af:5b:ed:c1:
39:57:4c:a6:ac:e5:d0:91:47:33:aa:ba:41:4a:02:ec:
ad:c0:bd:fd:d5:62:b8:be:62:cb:02:96:07:31:5e:b6:
a0:7f:ae:a6:0c:84:ec:26:72:4e:03:a7:0e:53:a8:c5:
bc:58:46:a5:fb:b7:9f:48:b0:40:bc:47:0c:d8:d7:38:
34:3e:0a:3e:db:8a:a0:a7:21:53:e3:98:83:41:b9:95:
6f:eb:96:9d:e7:35:47:74:1e:9c:bd:85:62:bf:35:1f:
26:ff:04:a4:de:9f:e5:4f:f7:c5:f5:17:36:43:a6:eb:
a9:9b:9a:34:be:67:90:cd:39:49:b2:0a:f2:cf:31:d4:
3b:74:e3:31:92:27:0e:84:90:66:b4:ed:dd:db:98:5b
Exponent: 65537 (0x10001)
Signed Extensions:
Name: Certificate Key Usage
Usages: Digital Signature
Non-Repudiation
Key Encipherment
Data Encipherment
Signature Algorithm: PKCS #1 SHA-256 With RSA Encryption
Signature:
0b:c6:e9:29:16:c7:71:50:74:7f:1b:69:53:47:dd:d5:
c2:12:14:ce:c8:6e:71:1d:c4:dd:7c:84:50:74:66:03:
82:e9:bc:49:e2:29:30:9f:ae:a2:2f:f4:3d:21:d6:1e:
2b:2e:e5:cb:05:73:6b:74:89:38:ec:10:49:37:e2:c6:
cb:3e:14:f7:fb:12:0c:7b:94:13:db:70:13:64:76:29:
ca:7e:d2:ab:52:f5:20:f2:90:17:a7:e6:ee:e8:49:6f:
45:cd:7f:e2:bf:a8:9c:c2:55:db:e2:94:77:49:c0:86:
b8:d6:7f:2e:44:6b:72:38:80:be:b6:bb:b3:11:ea:32:
a8:75:ad:bc:24:ec:52:d4:ee:1b:b1:6d:3a:42:8a:4b:
ea:6a:6f:9e:b8:cf:48:91:98:e2:64:97:e9:35:ea:e2:
52:0d:dd:1c:de:df:34:4e:74:9d:7d:8a:df:69:5a:0c:
b7:43:be:29:37:69:6f:f3:b4:19:2a:f7:11:4d:2c:36:
db:93:bb:30:ad:84:1a:fb:01:e9:9f:23:5e:69:67:7c:
27:7b:62:c3:67:82:9d:e8:30:b6:79:ed:5d:97:fe:81:
6d:af:20:20:bc:85:6a:7c:54:f6:b6:0b:13:17:54:dd:
ec:53:39:bb:39:50:1d:0a:68:4c:19:47:e4:54:5d:d4
Fingerprint (SHA-256):
B6:22:ED:F6:20:04:5D:25:DF:77:0C:13:3E:19:41:21:2C:0D:13:83:C4:1E:56:64:07:05:96:FE:1A:FA:82:1E
Fingerprint (SHA1):
5A:1A:99:7D:73:53:12:4A:F5:AB:B3:E4:E1:53:19:85:EC:B7:80:5A
Mozilla-CA-Policy: false (attribute missing)
Certificate Trust Flags:
SSL Flags:
Valid CA
Trusted CA
User
Trusted Client CA
Email Flags:
Valid CA
Trusted CA
User
Object Signing Flags:
Valid CA
Trusted CA
User
Step 4 – Configuring Ldap instance with TLS
cat m1.ldif
dn: cn=config
changetype: modify
replace: nsslapd-securePort
nsslapd-securePort: 5636
–
replace: nsslapd-security
nsslapd-security: on
cat m2.ldif
dn: cn=RSA,cn=encryption,cn=config
cn: RSA
objectClass: top
objectClass: nsEncryptionModule
nsSSLToken: internal (software)
nsSSLPersonalitySSL: server-cert
nsSSLActivation: on
ldapadd -D « cn=Directory Manager » -w secret12 -p 5389 -h myserver.example.com -f m2.ldif
cat m3.ldif
dn: cn=RSA,cn=encryption,cn=config
changetype: modify
replace: nsSSLToken
nsSSLToken: internal (software)
–
replace: nsSSLPersonalitySSL
nsSSLPersonalitySSL: server-cert
–
replace: nsSSLActivation
nsSSLActivation: on
ldapmodify -D « cn=Directory Manager » -w secret12 -p 5389 -h myserver.example.com -f m3.ldif
ldapmodify -D « cn=Directory Manager » -w secret12 -p 5389 -h myserver.example.com -f m1.ldif
modifying entry « cn=config »
ldapadd -D « cn=Directory Manager » -w secret12 -p 5389 -h myserver.example.com -f m2.ldif
adding new entry « cn=RSA,cn=encryption,cn=config »
ldapadd -D « cn=Directory Manager » -w secret12 -p 5389 -h myserver.example.com -f m3.ldif
modifying entry « cn=RSA,cn=encryption,cn=config »
Step 5 – Restarting Directory Server
Note:
The restart of the directory is automatic if you have correctly setup the pin.txt file in
/etc/dirsrv/slapd-myserver-5389 directory
If you see such a message, it means that the user has to enter the password manually, as the file pin.txt is wrongly configured.
Check also permission rights (dirsrv:dirsrv / 400)
# systemctl start dirsrv@myserver-5389
Enter PIN for Internal (Software) Token:
Step 6 – verifying LDAPS connection using openssl
Connection is done to test local ldaps port 5636
openssl s_client -connect localhost:5636
CONNECTED(00000003)
depth=0 CN = myserver.example.com
verify error:num=20:unable to get local issuer certificate
verify return:1
depth=0 CN = myserver.example.com
verify error:num=21:unable to verify the first certificate
verify return:1
—
Certificate chain
0 s:/CN=myserver.example.com
i:/CN=myserver.example.com
—
Server certificate
—–BEGIN CERTIFICATE—–
MIICwzCCAaugAwIBAgICNDgwDQYJKoZIhvcNAQELBQAwHDEaMBgGA1UEAxMRdnBz
NTkyMjYwLm92aC5uZXQwHhcNMTgxMjIxMTY1MTM3WhcNMTkwMzIxMTY1MTM3WjAc
MRowGAYDVQQDExF2cHM1OTIyNjAub3ZoLm5ldDCCASIwDQYJKoZIhvcNAQEBBQAD
ggEPADCCAQoCggEBAM2gQX/J5D3XtmkqN0fm8r9okMu+3cWJWGTm9fCOGC52QFJY
txrH7uRo3TAVPEugQC+FMNfJUbG2BmqdXwVlEtXJw9OP8QlKhI6bvYy79Vatqjmt
7DNJRD1pWh1wPGXlaqv2MSacXAjAVLnYnTKqAdbvply6zv9JD/DSoRVLjhHHN0J1
kvnAUFAgjCrYwOKNVWvHEFgruHCC9zZNgI+54n5jTVvXeWXxrrN6da9WVUpnzrUV
Kny8cXCPnAHiuDMTQ2rBiKM2bcc6UzAQ9+RoutVltxCqjYx46loyLqMeVQkbv07e
zZCo3u26NvdPj/lEcgnCDOJsxUwsRj/5K3HiSGMCAwEAAaMPMA0wCwYDVR0PBAQD
AgTwMA0GCSqGSIb3DQEBCwUAA4IBAQB1Wdm8LcFJUc0pAl6qf2Ya+FOohcC2CVZx
8PcCFpTX5xgeKKw+CE2lMNrzzDz1sJ1JvRUU/iCs+ES58Q1vrYOWMxOhGqr+Vkpa
4ZoUaWwo/pIBeMMrKQz9lqrV7POdHoBffvssCvI3CPFMkFvjQnSRhFumpLOsqk8L
XLh0x7yBrfe4WUN09V/t2qHalb1YPxLRoO5xqUjVL92C5y1YJMYK+27eTX16ppxz
t2LOG1oorz9lBOx2ZCP3wOMb35gduyTtN11hu9lw/hJorZXntb2E8b53slpb2qxj
LyeUJ9eNiZTvRHadW1KPY8cEl+7L6AF2hD1GiGoRRT/0MDej0yi3
—–END CERTIFICATE—–
subject=/CN=myserver.example.com
issuer=/CN=myserver.example.com
—
Acceptable client certificate CA names
/CN=myserver.example.com
Client Certificate Types: RSA sign, ECDSA sign, DSA sign
Requested Signature Algorithms: ECDSA+SHA256:ECDSA+SHA384:ECDSA+SHA512:ECDSA+SHA1:0x04+0x08:0x05+0x08:0x06+0x08:RSA+SHA256:RSA+SHA384:RSA+SHA512:RSA+SHA1:DSA+SHA256:DSA+SHA384:DSA+SHA512:DSA+SHA1
Shared Requested Signature Algorithms: ECDSA+SHA256:ECDSA+SHA384:ECDSA+SHA512:ECDSA+SHA1:RSA+SHA256:RSA+SHA384:RSA+SHA512:RSA+SHA1:DSA+SHA256:DSA+SHA384:DSA+SHA512:DSA+SHA1
Peer signing digest: SHA256
Server Temp Key: ECDH, P-256, 256 bits
—
SSL handshake has read 1275 bytes and written 427 bytes
—
New, TLSv1/SSLv3, Cipher is ECDHE-RSA-AES256-GCM-SHA384
Server public key is 2048 bit
Secure Renegotiation IS supported
Compression: NONE
Expansion: NONE
No ALPN negotiated
SSL-Session:
Protocol : TLSv1.2
Cipher : ECDHE-RSA-AES256-GCM-SHA384
Session-ID: 57E1D91C4EA7345B25FAA63E695FA5196D4B9E7DCA2880C0516888429628646A
Session-ID-ctx:
Master-Key: C0EB8535888A6D46C3642C42E136DECA0B17D41ACD56185BC81247C8E7D6932116B3059DEB4DD093A4BAC6365349CD3C
Key-Arg : None
Krb5 Principal: None
PSK identity: None
PSK identity hint: None
Start Time: 1545411700
Timeout : 300 (sec)
Verify return code: 21 (unable to verify the first certificate)
Output of this command showcase that ldaps is active for this instance.
Step 7) ldap client configuration
7.1) SSL documentation
SSL documentation is described at URL
7.2) ldap.conf
/etc/openldap/ldap.conf
TLS_CACERTDIR=etc/dirsrv/slapd-myserver-5389
TLS_CERT= server-cert
TLS_KEY= azerty1
Step 8) SSL connection test
Following request is able to connect to Ldap in SSL mode.
ldapsearch -H ldaps://myserver.example.com:5636 -D « cn=directory manager » -LLL -w secret12 -b dc=ovh,dc=net uid=frivat
ldapsearch -H ldaps://myserver.example.com:5636 -D « cn=directory manager » -LLL -w secret12 -b dc=ovh,dc=net uid=frivat
dn: uid=frivat,ou=People,dc=ovh,dc=net
telephoneNumber: 11112222
mail: frivat@example.com
cn:: RnJhbsOnb2lzIFJpdmF0
sn: rivat
objectClass: top
objectClass: person
objectClass: organizationalPerson
objectClass: inetorgperson
givenName: francois
uid: frivat
Step 9) How to troubleshot ldap client connection
The way to troubleshoot directory server client connection is to use -d 1 as below
[root@myserver slapd-myserver-2389]# ldapsearch -x -H ldaps://myserver:2636 -b « dc=ovh,dc=net » -d 1
ldap_url_parse_ext(ldaps://myserver:2636)
ldap_create
ldap_url_parse_ext(ldaps://myserver:2636/??base)
ldap_sasl_bind
ldap_send_initial_request
ldap_new_connection 1 1 0
ldap_int_open_connection
ldap_connect_to_host: TCP myserver:2636
ldap_new_socket: 3
ldap_prepare_socket: 3
ldap_connect_to_host: Trying 51.75.120.209:2636
ldap_pvt_connect: fd: 3 tm: -1 async: 0
attempting to connect:
connect success
TLSMC: MozNSS compatibility interception begins.
tlsmc_intercept_initialization: INFO: entry options follow:
tlsmc_intercept_initialization: INFO: cacertdir = `/etc/openldap/cacerts/’
tlsmc_intercept_initialization: INFO: certfile = `(null)’
tlsmc_intercept_initialization: INFO: keyfile = `(null)’
tlsmc_convert: INFO: trying to open NSS DB with CACertDir = `/etc/openldap/cacerts/’.
tlsmc_open_nssdb: INFO: trying to initialize moznss using security dir `/etc/openldap/cacerts` prefix « .
tlsmc_open_nssdb: WARN: could not initialize MozNSS context – error -8015.
tlsmc_convert: INFO: cannot open the NSS DB, expecting PEM configuration is present.
tlsmc_intercept_initialization: INFO: altered options follow:
tlsmc_intercept_initialization: INFO: cacertdir = `/etc/openldap/cacerts’
tlsmc_intercept_initialization: INFO: certfile = `(null)’
tlsmc_intercept_initialization: INFO: keyfile = `(null)’
tlsmc_intercept_initialization: INFO: successfully intercepted TLS initialization. Continuing with OpenSSL only.
TLSMC: MozNSS compatibility interception ends.
TLS: could not load verify locations (file:`/etc/dirsrv/slapd-myserver-2389/cert8.db’,dir:`/etc/openldap/cacerts’).
ldap_err2string
ldap_sasl_bind(SIMPLE): Can’t contact LDAP server (-1)
Step 10) Jexplorer
Manage Certificates and Keystores To use SSL in either form, you must manage a variety of certificates and private keys. These are kept in two Java keystores, which are password protected data stores. The first keystore, …//security/cacerts, with the password changeit, is used for storing the public certificates of trusted certificate authorities and servers. The second keystore, …//security/clientcerts, is used for storing the certificates and private keys of the JXplorer browser, and it has the password passphrase. Manage these keystores from the Security menu in JXplorer, where you can change the default keystore passwords. JXplorer uses the standard Java cryptography tools for its SSL support. These two files are standard Java keystores, which you can maintain using the Java keytool utility. This is a command line utility produced by Sun Microsystems. For more information, see keytool – Key and Certificate Management Tool ).
10.1) import de servert-cert.pem
servert-cert.pem is added to jexplorer (password changeit of truststore)
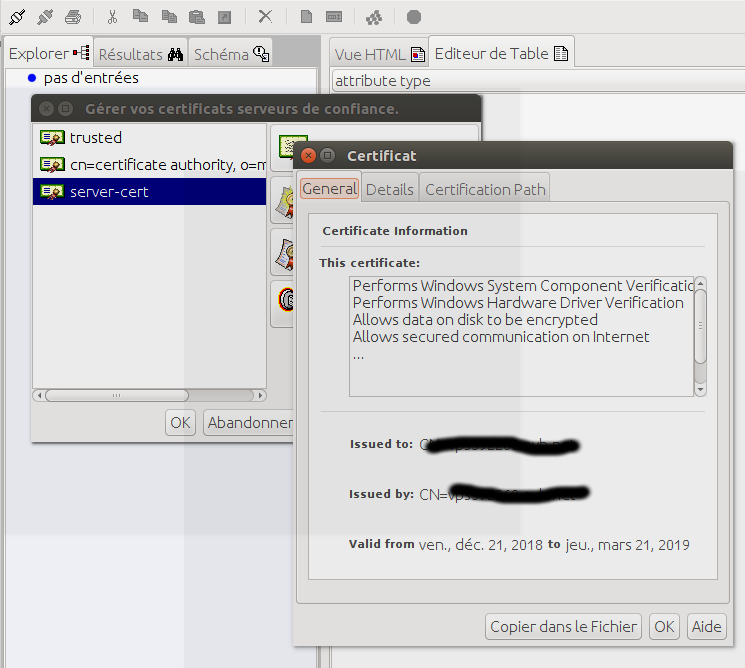
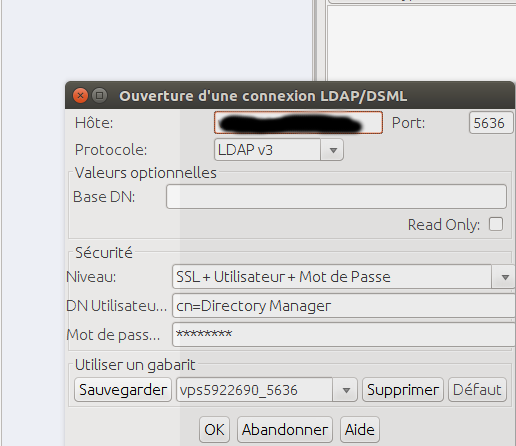
10.2) Remote connection over SSL
It is possible to connect remotely over ssl after having imported the certificate in the jexplorer keystore
11) firewall manipulation
11.1) adding new port to the firewall to be bypassed
firewall-cmd –zone=public –add-port=5389/tcp –add-port=5636/tcp –permanent
success
firewall-cmd –reload
success
11.2) Starting and stopping the firewall
systemctl stop firewalld
systemctl start firewalld

Open-IAM (Janua.fr) provides better security, buid relationships, and enable new cloud, mobile, and IoT offerings from any device or connected thing.
Janua.fr, a trademark of Open-IAM is an IT services and business consultancy company, created in July, 2004, by SUN Microsystems identity management industry veterans. Janua IAM activity spinned-off in August 2025 to Open-IAM.
- IAM & Regulatory Compliance - 2 avril 2026
- IAM: The Hidden GDPR Vulnerability in Your Cloud Stack - 19 mars 2026
- New Keycloak online training - 19 janvier 2022